Mackie DFX 12 Owner's Manual - Page 13
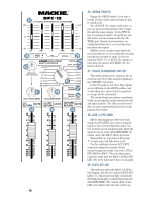
Auxiliaries, Aux 1/MON, Aux 2/EFX, Pan, Mute, Fader, OL Overload LED, Stereo Channel
 |
View all Mackie DFX 12 manuals
Add to My Manuals
Save this manual to your list of manuals |
Page 13 highlights
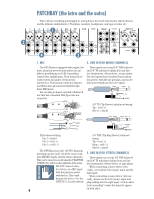
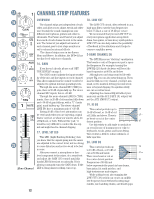
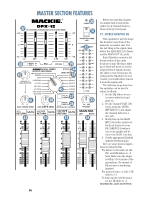
AUXILIARIES AUX 1/MON allows you to create a separate mono mix which can be used to feed stage monitors. AUX 2/EFX allows you to create another mono mix to feed the EMAC internal effects, and any external effects processor you have. The channel AUX knobs adjust how much of each channel is added to each aux mix. The adjustment ranges from off, through unity, and on up to 6 dB of extra gain. The stereo channel AUX knobs control a mono sum of the channel's stereo signals. For example, on the DFX•12, channel 9 (L) and 10 (R) mix together to feed that the channel 9/10 AUX knobs. The master AUX SEND (38, 41) knobs adjust the overall aux output levels. These are more than mere effects and monitor sends: they can be used to generate separate mixes for recording or "mix-minuses" for broadcast. 21. AUX 1/MON AUX 1 is designed for feeding a separate monitor mix to the musicians on stage, via the AUX 1 SEND (7) output jack. The signal is tapped off before the channel EQ section, and before the channel fader. Only the channel GAIN, MUTE and LOW CUT will affect the output to your monitors. 22. AUX 2/EFX AUX 2 is designed for feeding the EMAC internal effects processor and the inputs of parallel effects devices. It is post-fader, so any changes to the channel controls will affect the AUX 2 signal. In addition to feeding the inputs of the EMAC, it also feeds the AUX 2 SEND (8) output. 23. PAN This adjusts how much of the channel signal is playing in the left side of the main mix, and how much is playing in the right. For mono channels, if the PAN control is in the center position, the mono signal appears equally in both the left and right of the main mix. If the control is set left, more of the signal appears in the left side of the main mix. If the control is set right, more of the signal appears in the right side of the mix. For stereo channels, the PAN control works like the balance control on your home stereo, by attenuating one side or the other. If it is in the center position, the left and right channel signals pass through to the main mix unaffected. LEVEL 11/12 If PAN is turned left, the right channel is attenu- SET U ated; if turned right, the left side is attenuated. 24. MUTE When you engage a channel's MUTE switch, its signal disappears from the main mix, tape, AUX 1, AUX 2 and headphones. The only exception is the INSERT (4) outputs. 25. FADER This fader is the master level control for the channel's signal. Subtle adjustment of the channels' fader positions is the key to a finelytuned mix. Typically (providing the GAIN (16) control is set correctly) the fader position will be positioned somewhere between 0 dB ("U") and -30 dB. If you have a fader set all the way up, that's usually a sign that your GAIN is set too low. Conversely, if the fader is set way down, your GAIN may be set too high. -20dB +20dB GAIN U -15 +15 U EQ HI 12k -15 +15 LOW 80Hz AUX 1 U MON +6 2 U EFX +6 OO OO OO "U" = UNITY GAIN Mackie mixers have a "U" mark on almost every level control. This stands for "unity gain," meaning there is no change in signal level. Once you have adjusted the input signal to line-level, you can set every control at "U" and your signals will travel through the mixer at optimal levels. What's more, all the labels on our level controls are measured in dog biscuits (dB), so you'll know what you're doing level-wise if you choose to change a control's settings. L PAN R 11/12 MUTE dB 10 OL 5 U 26. OL (OVERLOAD) LED 5 This handy feature gives you the chance to take care of any signal overload before it is made worse by turning up the fader. This LED only lights when the channel's signals are set too high and are about to distort (clip). The OL circuit monitors the signal just before it reaches the channel fader, so any overload must be taken care of by adjusting the channel's GAIN, EQ, or the LOW CUT, and not the channel fader. If the LED comes on, make sure you reset the GAIN control correctly, and check that your channel EQ settings are not too high. 10 20 30 40 50 60 Stereo Channel (DFX•12) 13
-
 1
1 -
2
-
3
-
4
-
5
-
6
-
7
-
 8
8 -
 9
9 -
 10
10 -
 11
11 -
 12
12 -
 13
13 -
 14
14 -
 15
15 -
 16
16 -
 17
17 -
 18
18 -
19
-
20
-
21
-
22
-
23
-
24
 |
 |
