Mackie DFX 12 Owner's Manual - Page 15
Main/Aux 1 EQ Switch, Bypass EQ Switch, Power LED, Phantom Power Switch and LED, Meters, Phones Level - mixer manual
 |
View all Mackie DFX 12 manuals
Add to My Manuals
Save this manual to your list of manuals |
Page 15 highlights
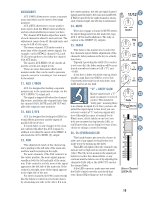
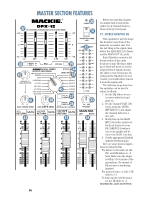
28. MAIN/AUX 1 EQ SWITCH This switch allows you to add EQ either to your main mix, or to your monitors. In the UP (MAIN) position, the EQ (27) only affects the main mix, phone or tape outs. In the DOWN (AUX 1) position, the EQ only affects the AUX SEND 1/MON (7) output; with no effect on the main mix, phone or tape outs. 29. BYPASS EQ SWITCH Use this switch to quickly compare the effect of your EQ settings. In the UP position, the EQ (27) section is in line with the signal path, (either main mix or monitor, depending on the position of the MAIN/AUX 1 (28) switch). In the DOWN position, the EQ section is bypassed and has no effect on any outputs. 30. POWER LED This LED turns on when the mixer is switched on, and (as you can probably guess) it turns off when the mixer is switched off. The meters display the level of the main mix, after the MAIN MIX (34) faders. You can get a good mix with the meter's peaks flashing anywhere between -20 and +8 dB. Most amplifiers clip at about +10 dB, and some recorders aren't so forgiving either. For best real-world results, try to keep your peaks between "0" and "+8." If your meters are too high, you will get distortion. If they are too low, then your signal/ noise will suffer. Use the meters to help you adjust the mixer for optimum performance without distortion or noise, then you can adjust your amplifiers for good overall volume. 33. PHONES This control allows you to adjust the headphone levels without disturbing the main mix. Turn this down before connecting and putting on your headphones. Bring it up slowly. Please see the "Safety Instructions" on page 2 for information on hearing protection. 34. MAIN MIX FADERS 31. PHANTOM POWER SWITCH and LED Press this switch to turn on the pretty LED. It also supplies phantom power to all of the mono channels' XLR MIC inputs. Phantom power is required to operate most condenser microphones (some condenser microphones are battery-powered). With the switch pressed in, the DFX Mixers provide +48 VDC phantom powering on pins 2 and 3 of the XLR connectors. Note: The stereo channels do not have phantom power on their XLR connectors. If you have dynamic, ribbon, or tube mics that do not require phantom power, leave the switch out. If you are using both condenser and dynamic mics, don't worry. Phantom power will not hurt most dynamic mics. Check the microphone's user manual if you're not sure. Caution: Turn all output These two faders control the final level of the signals sent to the MAIN (5) outputs. The TAPE (12) and PHONE (6) outputs also receive the main mix, but are not affected by these faders. All active mono and stereo channels that are not turned fully down will appear in the main mix. Other signals feeding these faders include: AUX 1 RETURN(9), AUX 2 RETURN (10) including the EMAC internal effects, and the CD/TAPE (11) inputs. The faders, set fully up, provide 10 dB of gain. A "U" unity gain point is just below that. When set fully down, the main mix is effectively muted. These are the faders to pull down at the end of the song when you want The Great Fade-Out. 35. CD/TAPE RETURN FADER and MUTE levels down before operating this switch to avoid the possibility of a "pop" in your speakers. If you have a CD or Tape player connected to the CD/TAPE (11) inputs, the signals pass through the MUTE switch, through this stereo fader, and then into your main mix. This is like a channel 32. METERS fader, except it is adding the CD/TAPE input to the main mix, instead of adding a channel. The DFX Mixer's metering system is made Set this fader to minimum, then play your up of two columns of twelve LEDs each, with selection and increase the fader as desired. thresholds ranging from -30 dB up to "CLIP." Assuming the MAIN MIX (34) faders are set, The 0 dB LEDs correspond to an output you should hear the music. Press down the level of +4 dBu (=1.23 V). The "CLIP" LEDs VOCAL ELIMINATOR (37) if you like to turn on when the output reaches +20 dBu. remove centered vocals, and BREAK (36) if There is a fair margin of safety before actual you want to play soothing CDs or tapes clipping distortion occurs, but you should turn while the band is breaking up the bar. things down if you see it come on. 15
-
 1
1 -
2
-
3
-
4
-
5
-
6
-
7
-
8
-
9
-
 10
10 -
 11
11 -
 12
12 -
 13
13 -
 14
14 -
 15
15 -
 16
16 -
 17
17 -
 18
18 -
 19
19 -
 20
20 -
21
-
22
-
23
-
24
 |
 |