Magnavox 52MF437S User manual, English (US) - Page 8
Getting started
 |
View all Magnavox 52MF437S manuals
Add to My Manuals
Save this manual to your list of manuals |
Page 8 highlights
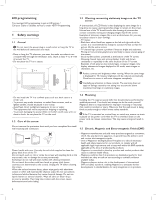
2 Getting started Welcome to the growing family of owners of Magnavox. 2.1 Connection overview There is a wide range of audio and video devices that can be connected to your TV. See Chapter 10 To connect and operate accessory devices. Before installing your TV or before hanging it on the wall, first connect your accessory devices. ! Do not insert the power plug into the mains at the bottom of the TV and in a wall socket before all connections are made. USB 14 13 R AUDIO L 12 VIDEO S VIDEO 42"-47"-52" 10 9 8 7 6 L R AUDIO OUT DISPLAY SYNCHRONIZED DISPLAY SYNC. OUT L IN DIGITAL AUDIO + AV 1 HDMI 1 AV 2 HDMI 2 AV 3 HDMI 3 R ANALOG AUDIO IN + HDMI 1 HDMI 2 HDMI 3 HDMI 1 AV 3 Y Pb Pr L 3 AUDIO VIDEO L AUDIO R R 2 AV 2 VIDEO L AUDIO R 1 S VIDEO Y Pb Pr AV 1 5 4 11 HDMI 2 HDMI 3 SERVICE UART ANTENNA 2.1.1 Back connections 1-2-3 AV1 - AV2 - AV3 To connect devices with - an S-Video connector and L and R audio cables - devices with 3 separate Component Video Output connectors (YPbPr) and Analog L and R audio cables - devices with Video and Audio L and R AV cables. 4-5-6 HDMI * To connect a device with a HDMI connector. If the accessory device has a DVI output only, see Chapter 10.7. 7 Analog Audio In L/R Analog audio for devices connected to a HDMI connector. 8 Digital Audio Out To connect a digital Home theater amplifier. 9 Digital Audio In 10 Audio Out L/R 11 Service UART For use only by authorized service personnel. For installers/integrators: Do not connect RS232 without level shifter. 2.1.2 Side connections 12 To connect devices with Video or S-Video and Audio Left and Right AV cables. (For ex. camera, camcorder, game, audio,...) 13 To connect your headphone. 14 To connect a USB device. * According to your type of set, 2 or 3 HDMI connectors are available. 4
-
 1
1 -
2
-
 3
3 -
 4
4 -
 5
5 -
 6
6 -
 7
7 -
 8
8 -
 9
9 -
 10
10 -
 11
11 -
 12
12 -
 13
13 -
14
-
15
-
16
-
17
-
18
-
19
-
20
-
21
-
22
-
23
-
24
-
25
-
26
-
27
-
28
-
29
-
30
-
31
-
32
-
33
-
34
-
35
-
36
-
37
-
38
-
39
-
40
-
41
-
42
-
43
-
44
-
45
-
46
-
47
-
48
-
49
-
50
-
51
-
52
-
53
-
54
-
55
-
56
-
57
-
58
-
59
-
60
-
61
-
62
-
63
-
64
-
65
-
66
-
67
-
68
-
69
-
70
-
71
-
72
-
73
-
74
-
75
-
76
-
77
-
78
-
79
-
80
-
81
-
82
-
83
-
84
-
85
-
86
-
87
-
88
-
89
-
90
-
91
-
92
-
93
-
94
-
95
-
96
-
97
-
98
-
99
-
100
-
101
-
102
-
103
-
104
-
105
-
106
-
107
-
108
-
109
-
110
-
111
-
112
-
113
-
114
-
115
-
116
-
117
-
118
-
119
-
120
-
121
 |
 |
