Marantz SR6005 SR6005 User Manual - English - Page 44
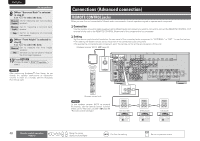
Connections Advanced connection
 |
View all Marantz SR6005 manuals
Add to My Manuals
Save this manual to your list of manuals |
Page 44 highlights
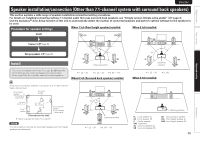
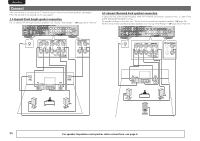
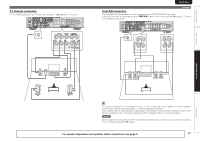
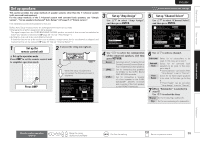
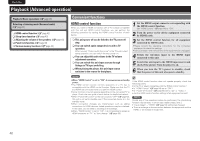
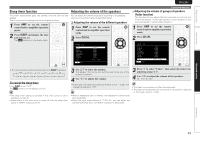
ENGLISH DEUTSCH FRANÇAIS Set up speakers 8 GWhen "Surround Back" is selected in step 6H Use o p to select the item. Measure Set for measuring two surround back (2spkrs) speakers. Measure Set for measuring a surround back (1spkr) speaker. Skip Set for no measuring of a surround back speaker. 9 GWhen "Front Height" is selected in step 6H Use o p to select the item. Measure Set to measure the front height speakers. Skip Set when you do not want to measure the front height speakers. 10 Press RETURN. Proceed to page 9 STEP1 Preparation step 5. NOTE After performing Audyssey® Auto Setup, do not change the speaker connections or subwoofer volume. In event of a change, perform Audyssey Auto Setup again. ITALIANO ESPAÑOL NEDERLANDS SVENSKA Connections (Advanced connection) REMOTE CONTROL jacks When you use this unit connected to Marantz audio components, it sends operation signals to operate each component. nnConnection Use the remote connection cable (supplied with a Marantz audio component you want to connect) to connect the REMOTE CONTROL OUT terminal of this unit to the REMOTE CONTROL IN terminal of the component to be connected. nnSetting Set the remote control switch located on the rear panel of the connected audio component to "EXTERNAL" or "EXT." to use this feature. • This setting will disable remote sensor reception of the connected audio component. • To operate the connected audio component, point the remote control at the remote sensor of this unit. Wireless receiver RX101 (vpage 22) 40 Remote control operation buttons Remote control unit NOTE To use wireless receiver RX101 as external IR receiver, set the remote sensor function of this unit to "Remote Lock:ON" (vpage 68 "Remote control settings"). REMOTE CONTROL IN OUT CD recorder EXTERNAL INTERNAL REMOTE CONTROL IN OUT DVD player EXTERNAL INTERNAL REMOTE CONTROL IN OUT CD player EXTERNAL INTERNAL Move the cursor (Up/Down/Left/Right) Confirm the setting Return to previous menu
-
 1
1 -
2
-
3
-
4
-
5
-
6
-
7
-
8
-
9
-
10
-
11
-
12
-
13
-
14
-
15
-
16
-
17
-
18
-
19
-
20
-
21
-
22
-
23
-
24
-
25
-
26
-
27
-
28
-
29
-
30
-
31
-
32
-
33
-
34
-
35
-
36
-
37
-
38
-
 39
39 -
 40
40 -
 41
41 -
 42
42 -
 43
43 -
 44
44 -
 45
45 -
 46
46 -
 47
47 -
 48
48 -
 49
49 -
50
-
51
-
52
-
53
-
54
-
55
-
56
-
57
-
58
-
59
-
60
-
61
-
62
-
63
-
64
-
65
-
66
-
67
-
68
-
69
-
70
-
71
-
72
-
73
-
74
-
75
-
76
-
77
-
78
-
79
-
80
-
81
-
82
-
83
-
84
-
85
-
86
-
87
-
88
-
89
-
90
-
91
-
92
-
93
-
94
-
95
-
96
-
97
-
98
-
99
-
100
-
101
-
102
-
103
-
104
 |
 |
