Marantz SR6005 SR6005 User Manual - English - Page 72
Other settings
 |
View all Marantz SR6005 manuals
Add to My Manuals
Save this manual to your list of manuals |
Page 72 highlights
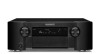
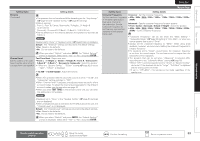
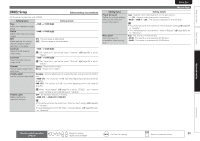
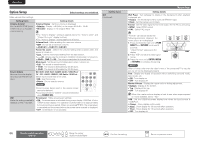
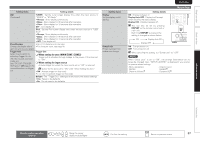
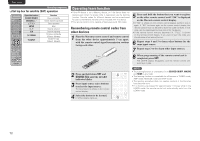
ENGLISH DEUTSCH FRANÇAIS ITALIANO ESPAÑOL NEDERLANDS SVENSKA Information Show information about receiver settings, input signals, etc. Items Status Show information about current settings. Audio Input Signal Show information about audio input signals. Setting details nn MAIN ZONE This item shows information about settings for MAIN ZONE. The information displayed differs according to the input source. Select Source / Name / Surround Mode / Input Mode / Decode Mode / HDMI / Digital / Component / Video Select / Video Mode / Content Type / Video Convert / i/p Scaler / Resolution / Progressive Mode / Aspect etc. nn ZONE2 This item shows information about settings for ZONE2. Power / Select Source / Volume Level Surround Mode : The currently set surround mode. Signal : The input signal type. fs : The input signal's sampling frequency. Format : The number of channels in the input signal (front, surround, LFE). Offset : The dialogue normalization correction value. Flag : This is displayed when inputting signals including a surround back channel. "MATRIX" is displayed with Dolby Digital EX and DTS-ES Matrix signals, "DISCRETE" with DTS-ES Discrete signals. Dialogue normalization function This function is automatically activated when playing Dolby Digital sources. It automatically corrects the standard signal level for individual program sources. The correction value can be checked using the STATUS. The figure is the corrected value. This cannot be changed. HDMI Information Show information about HDMI input/output signals and monitor. Preset Channel Show information about preset channels. SIRIUS HD Radio HDMI Signal Information • Resolution / Color Space / Pixel Depth HDMI Monitor Information • Interface / Supported resol. A / B / C / D / E / F / G A1 - A8 / B1 - B8 / C1 - C8 / D1 - D8 / E1 - E8 / F1 - F8 / G1 - G8 Other settings Remote control settings • When you connect a remote control receiver unit (purchased separately) to the REMOTE CONTROL IN terminal of this unit, use the following procedure to disable the remote sensor function of this unit. • The remote sensor function of remote control signals is enabled by default. MENU ON/STANDBY o nnDisabling the sensor function of the remote control unit When the main unit is in standby mode, press ON/STANDBY while holding down o and MENU on the main unit. "Remote Lock:ON" is shown on the display, and the infrared light receiving function is disabled. nnEnabling the remote sensor function When the main unit is in standby mode, press ON/STANDBY while holding down o and MENU on the main unit. The infrared light receiving function on the main unit is enabled. NOTE If a remote control receiver unit (purchased separately) is not connected, do not perform this setting. If you do, you will not be able to operate this unit using the remote control unit. 68
-
 1
1 -
2
-
3
-
4
-
5
-
6
-
7
-
8
-
9
-
10
-
11
-
12
-
13
-
14
-
15
-
16
-
17
-
18
-
19
-
20
-
21
-
22
-
23
-
24
-
25
-
26
-
27
-
28
-
29
-
30
-
31
-
32
-
33
-
34
-
35
-
36
-
37
-
38
-
39
-
40
-
41
-
42
-
43
-
44
-
45
-
46
-
47
-
48
-
49
-
50
-
51
-
52
-
53
-
54
-
55
-
56
-
57
-
58
-
59
-
60
-
61
-
62
-
63
-
64
-
65
-
66
-
 67
67 -
 68
68 -
 69
69 -
 70
70 -
 71
71 -
 72
72 -
 73
73 -
 74
74 -
 75
75 -
 76
76 -
 77
77 -
78
-
79
-
80
-
81
-
82
-
83
-
84
-
85
-
86
-
87
-
88
-
89
-
90
-
91
-
92
-
93
-
94
-
95
-
96
-
97
-
98
-
99
-
100
-
101
-
102
-
103
-
104
 |
 |