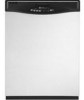
Maytag MDB4651AWS Installation Instructions - Page 6
Hoohups - manual
 |
View all Maytag MDB4651AWS manuals
Add to My Manuals
Save this manual to your list of manuals |
Page 6 highlights
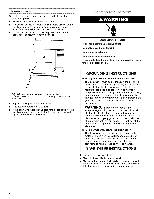
HOOHUpS Instal Electrical Connection--Direct Wire Method 1. Drill a 3/4"(1.9 cm) hole in the right-hand cabinet side or the rear of the opening. A B 2. If the cabinet is wood, sand hole until smooth. If the cabinet is metal, cover the hole with a grommet (Part Number 302797) included with power supply cord kit. See "Electrical Requirements." Install Water Line 1. Drill a 1/2=(1.3 cm) hole in the left-hand cabinet side or the rear of opening. A B A. Optional locations B. Preferred locations 2. If the cabinet is wood, sand the hole until smooth. If the cabinet is metal, cover the hole with a grommet (not provided). 3. Route the wire from the power supply through the cabinet hole. The wire must extend to the front right-hand side of the cabinet opening. 4. Tape the wire to the floor in the area shown. This will keep the wire from moving when the dishwasher is moved into the cabinet opening. A. Preferred locations B. Op rional Io ca tio ns 2. Measure the overall length of the water line (copper tubing or flexible braided water supply line) required. 3. Attach the water line (copper tubing or flexible braided water supply line) to the hot water supply line in compliance with local codes and ordinances. NOTE: The hot water supply line should have a manual shutoff valve. 4. Slowly route the water line (copper tubing or flexible braided water supply line) through the hole in the cabinet. NOTE: Copper tubing will bend and kink easily. The water line (copper tubing or flexible braided water supply line) should be far enough into the cabinet opening to connect to the dishwasher inlet on the front left-hand side of the dishwasher. A. 6" (15.2 cm) Install Electrical Connection-- Power Supply Cord Method NOTE: A mating, grounded 3 prong outlet is required in a cabinet next to the dishwasher opening. 1. Drill a 11/2=(3.8 cm) hole in the cabinet side or the rear of the opening. ;.5,-, A B m A. Optional locations B. Preferred locations 6
-
 1
1 -
 2
2 -
 3
3 -
 4
4 -
 5
5 -
 6
6 -
 7
7 -
 8
8 -
 9
9 -
 10
10 -
 11
11 -
 12
12 -
13
-
14
-
15
-
16
-
17
-
18
-
19
-
20
-
21
-
22
-
23
-
24
-
25
-
26
-
27
-
28
-
29
-
30
-
31
-
32
-
33
-
34
-
35
-
36
 |
 |
