Maytag MDB4651AWS Installation Instructions - Page 9
Tip Over Hazard - dishwasher model #
 |
View all Maytag MDB4651AWS manuals
Add to My Manuals
Save this manual to your list of manuals |
Page 9 highlights
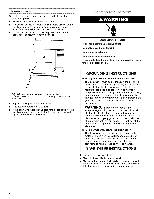
3. Using a 1/4"hex socket, nut driver or Phillips screwdriver, remove the 4 screws attaching the toekick panel and lower panel to the dishwasher. NOTE: Do not remove the tech sheet from the access panel. Tip Over Hazard Do not use dishwasher until completely installed. Do not push down on open door. Doing so can result in serious injury or cuts. Excessive Weight Hazard Use two or more people to move and install dishwasher. Failure to do so can result in back or other injury. 1. Fold insulation down over back and sides of dishwasher (on some models). 4. Remove both panels and set aside on a covered surface. 5. Apply plumber's tape or pipe joint compound to the 90 ° elbow fitting and connect the fitting to the water inlet valve. 6. Tighten the 90 ° elbow fitting until snug. NOTE: Elbow should face to the rear of the dishwasher. 2. Using 2 or more people, place the dishwasher on its back on a piece of cardboard. NOTE: If the door panel will be used as a work table, place a towel over it to avoid damage to the door panel. B A. Water inlet valve B. Elbow
-
 1
1 -
2
-
3
-
 4
4 -
 5
5 -
 6
6 -
 7
7 -
 8
8 -
 9
9 -
 10
10 -
 11
11 -
 12
12 -
 13
13 -
 14
14 -
15
-
16
-
17
-
18
-
19
-
20
-
21
-
22
-
23
-
24
-
25
-
26
-
27
-
28
-
29
-
30
-
31
-
32
-
33
-
34
-
35
-
36
 |
 |
