Maytag MDB4651AWS Installation Instructions - Page 7
Install Drain Hose
 |
View all Maytag MDB4651AWS manuals
Add to My Manuals
Save this manual to your list of manuals |
Page 7 highlights
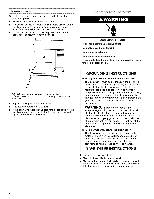
5= Turn on the water shutoff valve. Run water into a shallow pan to flush the water line (copper tubing or flexible braided water supply line) of particles that may clog the inlet valve. 3= Use a rubber hose connector (not provided) with screw-type clamps (not provided) to connect the air gap to the waste disposer inlet above the drain trap and at least 20" (50.8 cm) above the floor. A B 6. Turn off the water shutoff valve. Install Drain Hose IMPORTANT: Always use a new drain hose even when installing a new replacement dishwasher. • Drill a 1V2"(3.8 cm) diameter hole in the cabinet wall on the side of the opening closest to the sink. H GF A. Drain hose--cut here, if needed B. Screw-type clamps C. Air gap D. Large drain hose clamp (provided) E. Drain hose F. Rubber hose connector (not provided) G. Disposer inlet H. Drain trap 4= Insert the drain hose through the hole cut in the cabinet and to the front and center of the opening where the drain connection will be made. A Connect Drain Hose to Air Gap--Waste Disposer 1. Remove the waste disposer knockout plug. Cut the end of the drain hose, if needed. NOTE: Do not cut the ribbed section. 2= Attach the drain hose to the air gap with the large drain hose clamp (provided). NOTE: If the drain hose was cut, use 1W' to 2" (3.8 to 5 cm) screw-type clamp (not provided). A. Drain hose Connect Drain Hose to Air Gap--No Waste Disposer 1. Cut the end of the drain hose, if needed. NOTE: Do not cut the ribbed section. 2. Attach the drain hose to the air gap with the large drain hose clamp (provided). NOTE: If the drain hose was cut, use 11/2"to 2" (3.8 to 5 cm) screw-type clamp (not provided).
-
 1
1 -
 2
2 -
 3
3 -
 4
4 -
 5
5 -
 6
6 -
 7
7 -
 8
8 -
 9
9 -
 10
10 -
 11
11 -
 12
12 -
13
-
14
-
15
-
16
-
17
-
18
-
19
-
20
-
21
-
22
-
23
-
24
-
25
-
26
-
27
-
28
-
29
-
30
-
31
-
32
-
33
-
34
-
35
-
36
 |
 |
