Maytag MFC2061HEW Use and Care Guide - Page 7
Handles - parts
 |
UPC - 719881157368
View all Maytag MFC2061HEW manuals
Add to My Manuals
Save this manual to your list of manuals |
Page 7 highlights
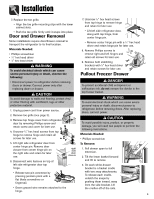
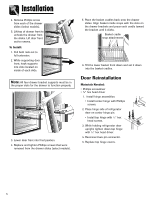
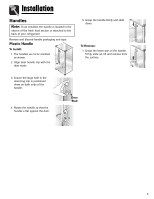
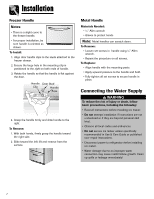
Installation Handles Note: If not installed, the handle is located in the interior of the fresh food section or attached to the back of your refrigerator. Remove and discard handle packaging and tape. Plastic Handle To Install: 1. The handles are to be oriented as shown. 2. Align door handle clip with the door studs. 5. Grasp the handle firmly and slide down. To Remove: 1. Grasp the lower part of the handle firmly, slide up, lift and remove from the surface. 3. Ensure the large hole in the mounting clip is positioned down on both ends of the handle. 4. Rotate the handle so that the handle is flat against the door. Door Stud 6
-
 1
1 -
 2
2 -
 3
3 -
 4
4 -
 5
5 -
 6
6 -
 7
7 -
 8
8 -
 9
9 -
 10
10 -
 11
11 -
 12
12 -
13
-
14
-
15
-
16
-
17
-
18
-
19
-
20
-
21
-
22
-
23
-
24
-
25
-
26
-
27
-
28
-
29
-
30
-
31
-
32
-
33
-
34
-
35
-
36
-
37
-
38
-
39
-
40
-
41
-
42
-
43
-
44
-
45
-
46
-
47
-
48
-
49
-
50
-
51
-
52
-
53
-
54
-
55
-
56
-
57
-
58
-
59
-
60
-
61
-
62
-
63
-
64
-
65
-
66
-
67
-
68
-
69
-
70
-
71
-
72
-
73
-
74
-
75
-
76
-
77
-
78
-
79
-
80
-
81
-
82
-
83
-
84
-
85
-
86
-
87
-
88
-
89
-
90
-
91
-
92
-
93
-
94
-
95
-
96
 |
 |

6
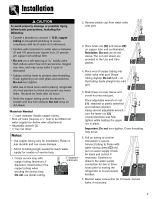
Installation
5. Grasp the handle firmly and slide
down
.
To Remove:
1. Grasp the lower part of the handle
firmly, slide
up
, lift and remove from
the surface.
Handles
Remove and discard handle packaging and tape.
Plastic Handle
To Install:
1. The handles are to be oriented
as shown.
2. Align door handle clip with the
door studs.
Note:
If not installed, the handle is located in the
interior of the fresh food section or attached to the
back of your refrigerator.
4. Rotate the handle so that the
handle is flat against the door.
3. Ensure the large hole in the
mounting clip is positioned
down
on both ends of the
handle.
Door
Stud