Maytag MFC2061HEW Use and Care Guide - Page 8
Connecting the Water Supply - specifications
 |
UPC - 719881157368
View all Maytag MFC2061HEW manuals
Add to My Manuals
Save this manual to your list of manuals |
Page 8 highlights
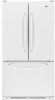
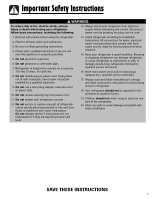
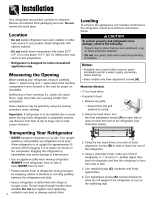
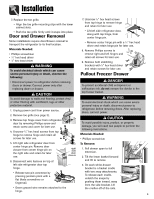
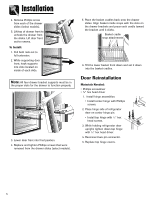
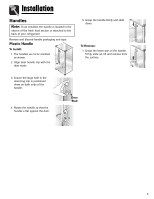
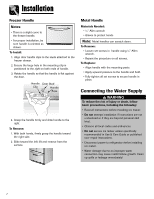
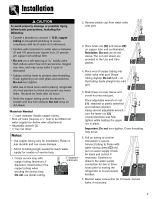
Installation Freezer Handle Notes • There is a slight curve to the freezer handle. • For proper installation, be sure handle is oriented as shown. To Install: 1. Align door handle clips to the studs attached to the freezer drawer. 2. Ensure the large hole in the mounting clip is positioned to the right on both ends of handle. 3. Rotate the handle so that the handle is flat against the door. Handle Door Stud Clip Handle Base 4. Grasp the handle firmly and slide handle to the right. To Remove: 1. With both hands, firmly grasp the handle toward the right side. 2. Slide toward the left, lift and remove from the surface. Metal Handle Materials Needed: • 3⁄32" Allen wrench • Gloves to protect hands Note: Metal handles can scratch doors. To Remove: • Loosen set screws in handle using 3⁄32" Allen wrench. • Repeat the procedure on all screws. To Replace: • Align handle with the mounting posts. • Apply upward pressure to the handle and hold. • Fully tighten all set screws to secure handle in place. Connecting the Water Supply WARNING To reduce the risk of injury or death, follow basic precautions, including the following: • Read all instructions before installing ice maker. • Do not attempt installation if instructions are not understood or if they are beyond personal skill level. • Observe all local codes and ordinances. • Do not service ice maker unless specifically recommended in Use & Care Guide or published user-repair instructions. • Disconnect power to refrigerator before installing ice maker. • Water damage due to an improper water connection may cause mold/mildew growth. Clean up spills or leakage immediately! 7
-
 1
1 -
2
-
 3
3 -
 4
4 -
 5
5 -
 6
6 -
 7
7 -
 8
8 -
 9
9 -
 10
10 -
 11
11 -
 12
12 -
 13
13 -
14
-
15
-
16
-
17
-
18
-
19
-
20
-
21
-
22
-
23
-
24
-
25
-
26
-
27
-
28
-
29
-
30
-
31
-
32
-
33
-
34
-
35
-
36
-
37
-
38
-
39
-
40
-
41
-
42
-
43
-
44
-
45
-
46
-
47
-
48
-
49
-
50
-
51
-
52
-
53
-
54
-
55
-
56
-
57
-
58
-
59
-
60
-
61
-
62
-
63
-
64
-
65
-
66
-
67
-
68
-
69
-
70
-
71
-
72
-
73
-
74
-
75
-
76
-
77
-
78
-
79
-
80
-
81
-
82
-
83
-
84
-
85
-
86
-
87
-
88
-
89
-
90
-
91
-
92
-
93
-
94
-
95
-
96
 |
 |