Meade LX70 R5 5 inch Instruction Manual - Page 13
Observe the Moon, Tracking Objects
 |
View all Meade LX70 R5 5 inch manuals
Add to My Manuals
Save this manual to your list of manuals |
Page 13 highlights
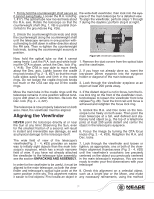
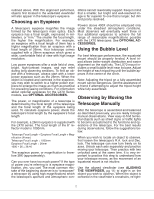
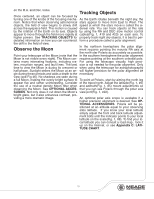
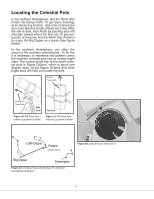
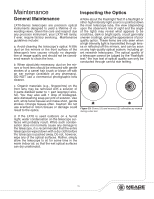
en the R.A. and Dec. locks. Tracking Objects Once centered, an object can be focused by turning one of the knobs of the focusing mecha- As the Earth rotates beneath the night sky, the nism. Notice that when observing astronomical stars appear to move from East to West. The objects, the field of view begins to slowly drift speed at which the stars move is called the si- across the eyepiece field. This motion is caused dereal rate. You can track objects at this rate by the rotation of the Earth on its axis. Objects by using the RA and DEC slow motion control appear to move through the field more rapidly at cables(Fig. 1, #19 and #20) on each axis. To higher powers. See TRACKING OBJECTS for properly track night sky objects, it is best to per- detailed information on how you can counteract form a procedure called a polar alignment. the drift in the field of view. Observe the Moon In the northern hemisphere the polar alignment requires pointing the mounts RA axis at the north star Polaris as accurately as possible. Point your telescope at the Moon (note that the In the southern hemisphere the polar alignment Moon is not visible every night). The Moon con- requires pointing at the southern celestial pole. tains many interesting features, including cra- For using the telescope visually, high preci- ters, mountain ranges, and fault lines. The best sion is not needed for the polar alignment. Only time to view the Moon is during its crescent or when using the telescope for astrophotography half phase. Sunlight strikes the Moon at an an- will higher precision for the polar alignment be gle during these periods and adds a depth to the necessary. view (see Fig 46). No shadows are seen during a full Moon, making the overly bright surface to To point at Polaris, start by aiming the north leg appear flat and rather uninteresting. Consider of the tripod north. Adjust the latitude(Fig. 1, #6) the use of a neutral density Moon filter when and azimuth(Fig. 1, #5) mount adjustments so observing the Moon. See OPTIONAL ACCES- that you can see Polaris through the polar axis SORIES. Not only does it cut down the Moon's view port(Fig. 1, #22). bright glare, but it also enhances contrast, pro- viding a more dramatic image. An optional polar axis scope is available if a higher precision alignment is desired. See OP- TIONAL ACCESSORIES. Polaris will be po- sitioned at an altitude equal to your observing sites latitude. If you know your local latitude simply adjust the front and back latitude adjust- ment bolts until the indicator points to your local latitude on the scale(Fig. 1, #8). To find your lo- cal latitude you can consult a road map , look it up on the Internet, or see Appendix C: LATI- TUDE CHART. 13
-
 1
1 -
2
-
3
-
4
-
5
-
6
-
7
-
 8
8 -
 9
9 -
 10
10 -
 11
11 -
 12
12 -
 13
13 -
 14
14 -
 15
15 -
 16
16 -
 17
17 -
 18
18 -
19
-
20
-
21
-
22
-
23
-
24
-
25
-
26
-
27
-
28
 |
 |