Meade Tripod LX90-ACF 10 inch User Manual - Page 12
Scroll Keys, brackets, Coil Cord Port, pg. 10, Fig. 2, 9, Coil Cord, Pg. 7, Fig. 1, 13A, RS-232 Port
 |
View all Meade Tripod LX90-ACF 10 inch manuals
Add to My Manuals
Save this manual to your list of manuals |
Page 12 highlights
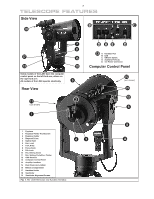
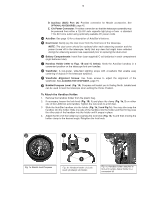
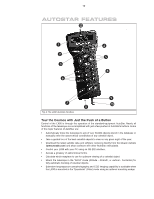
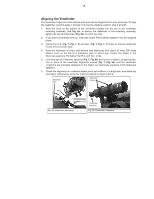
12 ᕧ Scroll Keys: Accesses options within a selected menu. The menu is displayed on the first line of the screen. Options within the menu are displayed, one at a time, on the second line. Press the Scroll keys to move through the options. Press and hold a Scroll key to move quickly through the options. The Scroll keys also scroll through the letters of the alphabet and numerical digits. NOTE: The Scroll Down key and the Down Arrow key move forward through the alphabet & digits (A to Z, 0 to 9). The Scroll Up key and the Up Arrow key move backward (Z to A, 9 to 0). Common symbols are also available in the list. ᕨ ? Key: Accesses the "Help" file. "Help" provides on-screen information on how to accomplish whatever task is currently active. Hold down the ? key and then follow the prompts on the display to access details of AutoStar functions in the Help feature. The Help system is essentially an on-screen instruction manual. If you have a question about an AutoStar operation, e.g., INITIALIZATION, ALIGNMENT, etc., hold down the ? key and follow the directions that scroll on the second line of the LCD screen. When a word appears in [brackets], press ENTER to access the AutoStar Glossary. A definition or more detailed information is displayed. Press MODE to return to the scrolling AutoStar Help display. When satisfied with the Help provided, press MODE to return to the original screen and continue with the chosen procedure. ¾ Coil Cord Port: Plug one end of the AutoStar coil cord into this port (pg. 10, Fig. 2, 9) located at the bottom of the AutoStar handbox. µ Coil Cord: Plug one end of the AutoStar coil cord into the HBX port (Pg. 7, Fig. 1, 13A) of the computer control panel of the telescope and the other end into the coil cord port (see j above). ¸ RS-232 Port: plug an RS-232 cable into AutoStar for updating functions such as "Download" or "Clone". See page 30 for more details. ¹ Utility Light: Use this built-in red light to illuminate star charts and accessories without disturbing your eye's adaptation to darkness.
-
 1
1 -
2
-
3
-
4
-
5
-
6
-
 7
7 -
 8
8 -
 9
9 -
 10
10 -
 11
11 -
 12
12 -
 13
13 -
 14
14 -
 15
15 -
 16
16 -
 17
17 -
18
-
19
-
20
-
21
-
22
-
23
-
24
-
25
-
26
-
27
-
28
-
29
-
30
-
31
-
32
-
33
-
34
-
35
-
36
-
37
-
38
-
39
-
40
-
41
-
42
-
43
-
44
-
45
-
46
-
47
-
48
-
49
-
50
-
51
-
52
-
53
-
54
-
55
-
56
-
57
-
58
-
59
-
60
 |
 |
