Meade Tripod LX90-ACF 10 inch User Manual - Page 52
Precise Polar Alignment
 |
View all Meade Tripod LX90-ACF 10 inch manuals
Add to My Manuals
Save this manual to your list of manuals |
Page 52 highlights
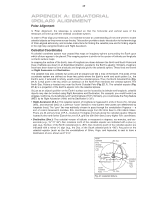
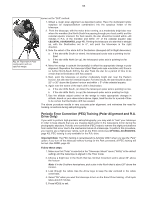
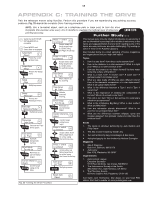
52 Setting The Polar Home Position a.Using the bubble level of the wedge, adjust the tripod legs so that the bubble is level. b. Set the wedge to your observing latitude. c. Using the Up and Down Arrow keys, rotate the telescope tube in Declination so that the telescope's Declination reads 90°, that is the molded Dec. pointer (Pg. 7, Fig. 1, 11) is pointed to 90° on the Dec. setting circle. d.Loosen the R.A. lock, and rotate the fork arms to the 00 position H. A. on the R.A. setting circle. In this position the telescope fork arms should be level and the viewfinder should be on the top side of the OTA. e.Use the azimuth and latitude controls on the wedge to center Polaris in the field of view. Do not use the AutoStar handbox during this process. When Polaris is centered, the telescope is in the Polar Home Position. Tip: You can check if the Declination is set at true 90° in step 2c. Look through the eyepiece and rapidly slew the optical tube on the R.A. axis. If all the stars rotate around the center of the field of view, the Declination is set at 90°. If the stars arc out of the field of view, slew the optical tube on the Declination axis until you achieve the centering effect. Begin polar aligning the telescope by locating Polaris. Finding Polaris is simple. Most people recognize the "Big Dipper". The Big Dipper has two stars that point the way to Polaris (Pg. 50, Fig. 28). Once Polaris is found, it is a straightforward procedure to obtain a rough polar alignment. To line up with Polaris, follow the procedure described below. Refer to the instruction sheet included with your equatorial wedge for information about attaching the wedge to the telescope and also about using the azimuth and latitude controls. 1. Select "Setup: Telescope" from the AutoStar menus. Press ENTER. Scroll to "Telescope: Mount" and press ENTER. Scroll to "Scope Mounting: Polar" and press ENTER. The telescope mount is now set to the polar mode. 2. Press MODE until "Select Item: Setup" displays. Press ENTER. "Setup: Align" displays. Press ENTER. Scroll to "Align: One-Star" and press ENTER. AutoStar now prompts you to set the telescope in the polar home position. a. Using the bubble level of the wedge, adjust the tripod legs so that the bubble is level. b. Set the wedge to your observing latitude. c. Using the Up and Down Arrow keys, rotate the telescope tube in Declination so that the telescope's Declination reads 90°, that is the molded Dec. pointer (Pg. 7, Fig. 1, 11) is pointed to 90° on the Dec. setting circle. d. Loosen the R.A. lock, and rotate the fork arms to the 00 position H. A. on the R.A. setting circle. In this position the telescope fork arms should be level and the viewfinder should be on the top side of the OTA. e. Press ENTER. The telescope slews to Polaris. f. Use the azimuth and latitude controls on the wedge to center Polaris in the field of view. Do not use the AutoStar handbox during this process. When Polaris is centered, press ENTER. The telescope is now polar aligned. At this point, your polar alignment is good enough for casual observations. There are times, however, when you will need to have precise polar alignment, such as when making fine astrophotographs. Once the latitude angle of the wedge has been fixed and locked-in according to the above procedure, it is not necessary to repeat this operation each time the telescope is used, unless you move a considerable distance North or South from your original observing position. (Approximately 70 miles movement in North-South observing position is equivalent to 1° in latitude change.) The wedge may be detached from the field tripod and, as long as the latitude angle setting is not altered and the field tripod is leveled, it will retain the correct latitude setting when replaced on the tripod. The first time you polar align the telescope, check the calibration of the Declination setting circle (Fig. 1, 11). After performing the polar alignment procedure, center the star Polaris in the telescope field. Loosen the knurled central hub of the Declination setting circle and move the setting circle so that the molded triangular pointer to 90°. Tighten the knurled central hub to a a firm feel. Precise Polar Alignment It should be emphasized that while doing casual observing, precise alignment of the telescope's polar axis to the celestial pole is not necessary. Don't allow a time-consuming effort at lining up with the pole to interfere with your basic enjoyment of the telescope. For long-exposure photography, however, the ground rules are quite different, and precise polar alignment is not only advisable, but almost essential. Even though the LX90 telescopes offers a sophisticated drive system, the fewer tracking corrections required during the course of a long-exposure photograph, the better. ("Longexposure" means any photograph of a celestial object that last for 10 minutes or longer). In particular, the number of Declination corrections required is a direct function of the precision of polar alignment. Precise polar alignment requires the use of a crosshair eyepiece. The Meade Illuminated Reticle Eyepiece (see OPTIONAL ACCESSORIES, page 42) is well-suited in this application, but it is also preferable to increase the effective magnification through the use of a 2x or 3x Barlow lens as well. Follow this procedure (particularly if the pole star is not visible), sometimes better
-
 1
1 -
2
-
3
-
4
-
5
-
6
-
7
-
8
-
9
-
10
-
11
-
12
-
13
-
14
-
15
-
16
-
17
-
18
-
19
-
20
-
21
-
22
-
23
-
24
-
25
-
26
-
27
-
28
-
29
-
30
-
31
-
32
-
33
-
34
-
35
-
36
-
37
-
38
-
39
-
40
-
41
-
42
-
43
-
44
-
45
-
46
-
 47
47 -
 48
48 -
 49
49 -
 50
50 -
 51
51 -
 52
52 -
 53
53 -
 54
54 -
 55
55 -
 56
56 -
 57
57 -
58
-
59
-
60
 |
 |
