Meade Tripod LX90-ACF 10 inch User Manual - Page 53
Periodic Error Correction PEC Training Polar Alignment and R.A., Drive Only
 |
View all Meade Tripod LX90-ACF 10 inch manuals
Add to My Manuals
Save this manual to your list of manuals |
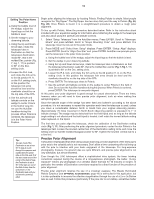
Page 53 highlights
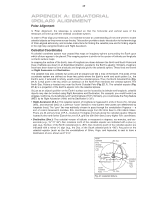
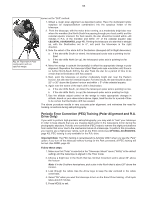
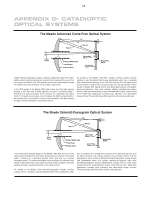
53 Fig. 32: Tripod set in Polar configuration with an optional wedge. known as the "Drift" method: 1. Obtain a rough polar alignment as described earlier. Place the illuminated reticle eyepiece (or eyepiece/Barlow combination) into the eyepiece holder of the telescope. 2. Point the telescope, with the motor drive running, at a moderately bright star near where the meridian (the North-South line passing through your local zenith) and the celestial equator intersect. For best results, the star should be located within ±30 minutes in R.A. of the meridian and within ±5° of the celestial equator (see CELESTIAL COORDINATES, page 49). Pointing the telescope at a star that is straight up, with the Declination set to 0°, will point the telescope in the right direction. 3. Note the extent of the star's drift in Declination (disregard drift in Right Ascension): a. If the star drifts South (or down), the telescope's polar axis is pointing too far East. b. If the star drifts North (or up), the telescope's polar axis is pointing too far West. 4. Move the wedge in azimuth (horizontally) to effect the appropriate change in polar alignment. Reposition the telescope's East-West polar axis orientation until there is no further North-South drift by the star. Track the star for a period of time to be certain that its Declination drift has ceased. 5. Next, point the telescope at another moderately bright star near the Eastern horizon, but still near the celestial equator. For best results, the star should be about 20° or 30° above the Eastern horizon and within ± 5° of the celestial equator. 6. Again note the extent of the star's drift in Declination: a. If the star drifts South, (or down) the telescope's polar axis is pointing too low. b. If the star drifts North, (or up) the telescope's polar axis is pointing too high. 7. Use the altitude adjust control on the wedge to make appropriate changes in altitude, based on your observations above. Again, track the star for a period of time to be certain that Declination drift has ceased. The above procedure results in very accurate polar alignment, and minimizes the need for tracking corrections during astrophotography. Periodic Error Correction (PEC) Training (Polar Alignment and R.A. Drive Only) If you wish to perform high-precision astrophotography, you may wish to "train" your telescope in order to keep objects that you are imaging dead center in the telescope's mirror during the photographic exposure. Periodic error correction (PEC) helps to remove the slight perturbations from center that occur due to the mechanical nature of a telescope. To perform this procedure, you need to use a high-power reticle, such as the 9mm reticle (see OPTIONAL ACCESSORIES, page 42). PEC training is only available for the R.A. drive. Important Note: The PEC training is remembered by AutoStar ONLY when you use the "Park" option. If you turn off the telescope without turning on the Park command, all PEC training will be lost. See PARK, page 28. Follow these steps: 1. Make sure that "Polar" is selected in the "Telescope: Mount" menu ("Alt/Az" is the default setting) and the telescope is aligned in the Polar mode. 2. Choose a bright star in the South that has minimal movement and is about 30° above the horizon Note: If in the Southern hemisphere, pick a star in the North that is about 30° above the horizon. 3. Look through the reticle. Use the Arrow keys to keep the star centered in the reticle cross-hairs. 4. Select "On" when you want the telescope to turn on the Smart Drive training. A full cycle takes about 8 minutes. 5. Press MODE to exit.
-
 1
1 -
2
-
3
-
4
-
5
-
6
-
7
-
8
-
9
-
10
-
11
-
12
-
13
-
14
-
15
-
16
-
17
-
18
-
19
-
20
-
21
-
22
-
23
-
24
-
25
-
26
-
27
-
28
-
29
-
30
-
31
-
32
-
33
-
34
-
35
-
36
-
37
-
38
-
39
-
40
-
41
-
42
-
43
-
44
-
45
-
46
-
47
-
 48
48 -
 49
49 -
 50
50 -
 51
51 -
 52
52 -
 53
53 -
 54
54 -
 55
55 -
 56
56 -
 57
57 -
 58
58 -
59
-
60
 |
 |
