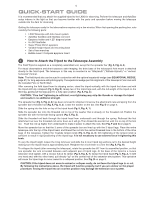
Meade Tripod LX90-ACF 10 inch User Manual - Page 6
Pg. 7, Fig. 1, 6 & 9, Fig. 1, 8
 |
View all Meade Tripod LX90-ACF 10 inch manuals
Add to My Manuals
Save this manual to your list of manuals |
Page 6 highlights
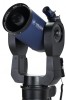
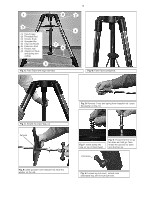
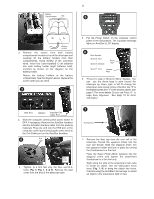
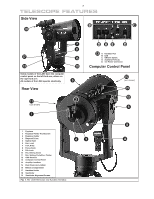
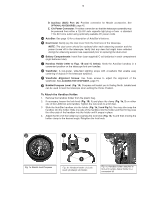
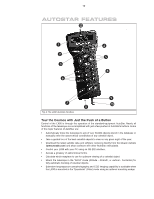
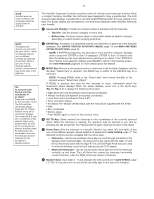
6 ᕢ ᕥ 2. Remove the covers from both battery compartments located on top of the drive base and carefully lift the battery holders from their compartments, being mindful of the connector wires. Insert four (user-supplied) C-cell batteries into each battery holder (eight batteries total), oriented as shown on the diagram on the battery holder. Return the battery holders to the battery compartment. See the diagram above. Replace the covers when you are done. ᕣ HBX Port ON/OFF AutoStar Coil Cable Port 3. Slide the computer control panel power switch to OFF, if necessary. Remove the AutoStar handbox and the AutoStar interface cable from the packing materials. Plug one end into the HBX port of the computer control panel and plug the other end into the Coil Cable port on the AutoStar handbox. ᕤ R.A. Lock Dec. Lock 4. Tighten, to a firm feel only, the Dec. and R.A. locks (Pg. 7, Fig. 1, 6 & 9). Remove the dust cover from the end of the telescope tube. 5. Flip the Power Switch on the computer control panel to the ON position. The copyright message lights on AutoStar's LCD display. ᕦ Slew Speeds: Speed 9: Fast . . . Speed 5: Medium . . . Speed 1: Slow Arrow Keys Number Keys 6. "Press 0 to align or Mode for Menu" displays. You can use the Arrow keys to slew (move) the telescope up, down, right, or left. To change the telescope's slew speed, press a Number key. "9" is the fastest speed and "1" is the slowest speed. See page 17 for more details. Or you can Press "0" to begin Easy Alignment. See page 18 for more information. ᕧ Thumbscrew Thumbscrew 7. Remove the dust cap from the rear cell of the telescope. Thread the eyepiece holder into the rear cell thread. Slide the diagonal prism into the eyepiece holder and lock in place by turning the thumbscrew to a firm feel. Place the Super Plössl 26mm eyepiece into the diagonal prism and tighten the attachment thumbscrew to a firm feel only. Sight along the side of the telescope's main tube to locate an object. Use the telescope's focus knob (Fig. 1, 8) to bring the object into focus. Practice using the AutoStar's Arrow keys to center an object in the telescope's field of view.
-
 1
1 -
 2
2 -
 3
3 -
 4
4 -
 5
5 -
 6
6 -
 7
7 -
 8
8 -
 9
9 -
 10
10 -
 11
11 -
 12
12 -
13
-
14
-
15
-
16
-
17
-
18
-
19
-
20
-
21
-
22
-
23
-
24
-
25
-
26
-
27
-
28
-
29
-
30
-
31
-
32
-
33
-
34
-
35
-
36
-
37
-
38
-
39
-
40
-
41
-
42
-
43
-
44
-
45
-
46
-
47
-
48
-
49
-
50
-
51
-
52
-
53
-
54
-
55
-
56
-
57
-
58
-
59
-
60
 |
 |
