Meade Tripod LX90-ACF 10 inch User Manual - Page 5
Fig. C, Fig. D, Fig. E, Fig. F, Fig. G, Fig. B, Fig. A, Fig. H
 |
View all Meade Tripod LX90-ACF 10 inch manuals
Add to My Manuals
Save this manual to your list of manuals |
Page 5 highlights
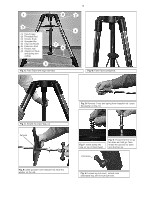
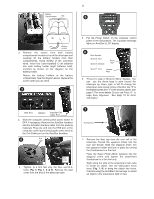
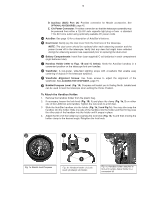
1 8 3 (1) Tripod Head (2) Threaded Rod (3) Tension Knob (4) Spreader Bar (5) Leg Lock Knobs (6) Extension Strut (7) Tension Hub (8) Attachment Nuts and Spring (not visible) 7 6 5 Fig. A: Field Tripod with legs extended. 5 2 4 Fig. B: Field Tripod (collapsed). Fig. D: Remove 2 nuts and spring from threaded rod. Leave the washer on the rod. Fig. C: Extend the tripod legs out. flat side Fig. E: Slide spreader over threaded rod. Note the washer on the rod. Fig. F: Insert spring into hole on top of tripod head. Fig. G: Thread the first nut as far down as it will go. Then thread the second nut down onto the first nut lock-lever Fig. H: Loosen leg lock lever, extend inner extendable leg, and re-lock lock lever.
-
 1
1 -
 2
2 -
 3
3 -
 4
4 -
 5
5 -
 6
6 -
 7
7 -
 8
8 -
 9
9 -
 10
10 -
 11
11 -
12
-
13
-
14
-
15
-
16
-
17
-
18
-
19
-
20
-
21
-
22
-
23
-
24
-
25
-
26
-
27
-
28
-
29
-
30
-
31
-
32
-
33
-
34
-
35
-
36
-
37
-
38
-
39
-
40
-
41
-
42
-
43
-
44
-
45
-
46
-
47
-
48
-
49
-
50
-
51
-
52
-
53
-
54
-
55
-
56
-
57
-
58
-
59
-
60
 |
 |

5
Fig. C:
Extend the tripod legs out.
Fig. D:
Remove 2 nuts and spring from threaded rod. Leave
the washer on the rod.
Fig. E:
Slide spreader over threaded rod. Note the
washer on the rod.
Fig. F:
Insert spring into
hole on top of tripod head.
Fig. G
: Thread the first nut as
far down as it will go. Then
thread the second nut down
onto the first nut
flat side
Fig. B:
Field Tripod (collapsed).
Fig. A:
Field Tripod with legs extended.
7
8
6
5
2
1
4
3
(1)
Tripod Head
(2)
Threaded Rod
(3)
Tension Knob
(4)
Spreader Bar
(5)
Leg Lock Knobs
(6)
Extension Strut
(7)
Tension Hub
(8)
Attachment Nuts
and Spring (not
visible)
Fig. H:
Loosen leg lock lever,
extend inner
extendable leg, and re-lock lock lever.
lock-lever