Meade Tripod LX90-ACF 10 inch User Manual - Page 22
Basic Autostar Operation
 |
View all Meade Tripod LX90-ACF 10 inch manuals
Add to My Manuals
Save this manual to your list of manuals |
Page 22 highlights
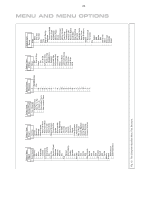
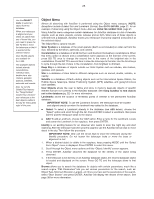
BASIC AUTOSTAR OPERATION Fig. 9: The AutoStar Universe: The six primary categories listed in the Select Item menu of AutoStar. Fig. 10 Menus set in a loop. Fig. 11: AutoStar levels. It is important to understand that menu selections are set in a loop (Fig. 10). This means that pressing the Scroll Down key (Pg. 10, Fig. 2, 7) cycles down through all the available options within a given category, then returns to the first option. The Scroll Up key (Pg. 10, Fig. 2, 7) cycles up through the options in the opposite order. Note that this capability is a quick way to get to an option that is near the bottom of the list. The following example demonstrates this capability. Example: To navigate to the "Select Item: Setup" menu option when the "Select Item: Object" menu is displayed: 1. Press the Scroll Down key four times or the Scroll Up key once. The screen in Fig. 11 displays two lines of information. The top line shows the current menu level. The second line displays an option which may be selected within that menu level. Some options are choices that select the next menu level down. The Scroll keys move up and down within the list of available options, showing one option at a time. When the desired option is displayed on the second line, press the ENTER key to choose that option and move down one menu level. Press the MODE key to leave a level; e.g., the wrong menu option is chosen. IMPORTANT NOTE: No matter how many levels into AutoStar are traveled, each press of the MODE key moves up a level, until the top level, "Select Item", is reached. Once in the Select Item level, press MODE to return to the topmost level, "Select Item: Object". AutoStar Navigation Exercise To demonstrate how the AutoStar menu structure works, the following exercise calculates Sunset time so an evening observing session can be planned. 22
-
 1
1 -
2
-
3
-
4
-
5
-
6
-
7
-
8
-
9
-
10
-
11
-
12
-
13
-
14
-
15
-
16
-
 17
17 -
 18
18 -
 19
19 -
 20
20 -
 21
21 -
 22
22 -
 23
23 -
 24
24 -
 25
25 -
 26
26 -
 27
27 -
28
-
29
-
30
-
31
-
32
-
33
-
34
-
35
-
36
-
37
-
38
-
39
-
40
-
41
-
42
-
43
-
44
-
45
-
46
-
47
-
48
-
49
-
50
-
51
-
52
-
53
-
54
-
55
-
56
-
57
-
58
-
59
-
60
 |
 |
