Memorex MI4290 User Guide - Page 15
To Set Or Reset The Alarm Time, Continued On The Next
 |
View all Memorex MI4290 manuals
Add to My Manuals
Save this manual to your list of manuals |
Page 15 highlights
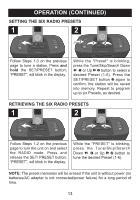
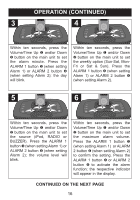
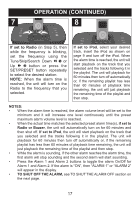
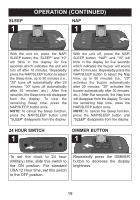
OPERATION (CONTINUED) TO SYNC THE TIME 1 DST (DAYLIGHT SAVINGS TIME) 1 ALARM1 ALARM2 With the power on, connect an iPod as shown on page 9. Press the SYNC button; the display time will blink and "SYNC" will blink thrice. The time and day of the week will then be synced. NOTE: The Sync function can sync the time with the iPod once only, unless the iPod is unplugged and plugged in again. The SYNC button will not set the alarm. The iPod mini, iPod photo and iPod 4th generation do not support the SYNC function. If you have been traveling, please make sure to reset your iPhone or iPod device so that the system clock on your device is updated to your current time zone. We recommend that you turn your iPhone or iPod device "OFF" and "ON". Also make sure to turn the unit "OFF" and "ON" and then, dock your iPhone or iPod device to SYNC. For your convenience, there is a DST (Daylight Savings Time) switch located on the rear of the unit. Slide the switch to +1 to add an hour to the actual time or slide the switch to -1 to subtract an hour from the actual time. TO SET OR RESET THE ALARM TIME 1 2 1 ALARM1 ALARM2 2 2 1 3 ALARM1 ALARM2 4 Press and hold either the ALARM 1 button 1 (to set Alarm 1) or ALARM 2 button 2 (to set Alarm 2); the Alarm hour will blink in the display. Within ten seconds, press the Volume/Time Up 1 and/or Down 2 button on the main unit to set the alarm hour. If the 24 hour switch is set to Off (12 hour mode), be sure to observe the AM or PM indicators to make sure you have set the hour correctly. Press the ALARM 1 button 3 (when setting Alarm 1) or ALARM 2 button 4 (when setting Alarm 2); the minutes will blink. CONTINUED ON THE NEXT PAGE 15
-
 1
1 -
2
-
3
-
4
-
5
-
6
-
7
-
8
-
9
-
 10
10 -
 11
11 -
 12
12 -
 13
13 -
 14
14 -
 15
15 -
 16
16 -
 17
17 -
 18
18 -
 19
19 -
 20
20 -
21
-
22
 |
 |
