Metabo BFE 9-20 Operating Instructions - Page 10
Cleaning, Maintenance, Tips and Tricks, Troubleshooting, Accessories, Repairs, Environmental
 |
View all Metabo BFE 9-20 manuals
Add to My Manuals
Save this manual to your list of manuals |
Page 10 highlights
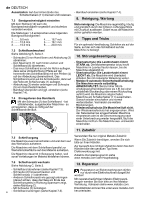
en ENGLISH 7.4 Adjusting belt run Using the screw (2), adjust the sanding belt while the machine is not in operation and is plugged out - so that it runs in the centre of the sanding belt roller. 2 interruption, the machine does not start up. Switch the machine off and on again. 11. Accessories Use only genuine Metabo accessories. If you need any accessories, check with your dealer. The dealer needs to know the exact model of your power tool in order to select the correct accessory. For a complete range of accessories, see www.metabo.com or the main catalogue. 7.5 Sanding procedure Switch the machine on first before mounting it on the workpiece. Place the machine on the material such that the sanding belt is parallel to the surface of the workpiece. Keep the machine in constant motion because otherwise recesses could be produced in the material. 12. Repairs Repairs to electrical tools must be carried out by qualified electricians ONLY! Contact your local Metabo representative if you have Metabo power tools requiring repairs. For addresses see www.metabo.com. You can download a list of spare parts from www.metabo.com. 7.6 Replacing the sanding attachment See illustration C, page 2. - Removing the sanding belt (see Section 7.3). - Remove screw (2), and remove sanding attachment (1). - Attach the other sanding attachment as shown (ensure that the nose at the end of the sanding attachment is pointing in the direction of the tensioning arm, see illustration C). - Secure with screw (2). - Attaching the sanding belt (see Section 7.3). - Adjusting the belt run (see Section 7.4). 8. Cleaning, Maintenance Motor cleaning: blow compressed air through the rear ventilation slots of the machine regularly, frequently and thoroughly. Here, the machine must be held firmly. 9. Tips and Tricks For optimum operation: Sand on the side on which the sanding belt moves towards the machine. 10. Troubleshooting - Overload protection: There is a MAJOR reduction in load speed. The motor temperature is too high! Allow the machine to run at idle speed until it has cooled down. - Overload protection: There is a SLIGHT reduction in load speed. The machine is overloaded. Reduce the load before continuing to work. - Restart protection: The machine does not start. The restart protection is active. If the mains plug is inserted with the machine switched on, or if the power supply is restored following an 10 13. Environmental Protection The sanding dust generated may contain hazardous materials: do not dispose of with the household waste, but at a special collection point for hazardous waste. Observe national regulations on environmentally compatible disposal and on the recycling of disused machines, packaging and accessories. Only for EU countries: Never dispose of power tools in your household waste! In accordance with European Guideline 2002/ 96/EC on used electronic and electric equipment and its implementation in national legal systems, used power tools must be collected separately and handed in for environmentally compatible recycling. 14. Technical Specifications Explanatory notes on the specifications on page 3. Changes due to technological progress reserved. BvPPm012L = Sanding belt length = Belt speed in idling = Nominal power input = Power output = Weight without mains cable Measured values determined in conformity with EN 60745. Machine in protection class II ~ Alternating current The technical specifications quoted are subject to tolerances (in compliance with the relevant valid standards). Emission values These values make it possible to assess the emissions from the power tool and to compare different power tools. Depending on the operating conditions, the condition of the power tool or the
-
 1
1 -
2
-
3
-
4
-
 5
5 -
 6
6 -
 7
7 -
 8
8 -
 9
9 -
 10
10 -
 11
11 -
 12
12 -
 13
13 -
 14
14 -
 15
15 -
16
-
17
-
18
-
19
-
20
-
21
-
22
-
23
-
24
-
25
-
26
-
27
-
28
-
29
-
30
-
31
-
32
-
33
-
34
-
35
-
36
-
37
-
38
-
39
-
40
-
41
-
42
-
43
-
44
-
45
-
46
-
47
-
48
-
49
-
50
-
51
-
52
-
53
-
54
-
55
-
56
-
57
-
58
-
59
-
60
-
61
-
62
-
63
-
64
-
65
-
66
-
67
-
68
 |
 |
