Miele KF 1911 Vi Operating and Installation manual - Page 65
Securing an alternative anti-tip, device, Determine the number of screws
 |
View all Miele KF 1911 Vi manuals
Add to My Manuals
Save this manual to your list of manuals |
Page 65 highlights
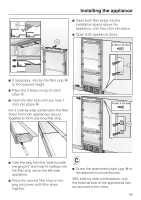
Installing the appliance Securing an alternative anti-tip device If the anti-tip brackets cannot be attached securely, an alternative anti-tip device can be used. Ensure that there is no "give" between the appliance and the anti-tip device. If possible, always screw the wooden beam to existing studs. - The beam must cover the appliance by at least 2" (50.8 mm). ^ Mark the installation height (lower edge of the beam) on the rear wall of the niche. ^ Select screws according to the thickness of the wooden beam. Example: 3 ½" (89 mm) screw for 2x4 beam. Determine the number of screws based on the cavity width, to ensure that the beam will be attached securely. ^ Locate wall studs near the rear wall of the cavity and mark drill holes in the beam. ^ Pre-drill the wooden beam. ^ Attach the wooden beam to the rear wall of the niche. Now prepare the water connection from the appliance to the main supply line (see "Plumbing"). ^ Cut a wooden beam (cross section min. 3" x 4" [75 mm x 100 mm]) to the required length. - The length is equal to the width of the installation niche. - If the installation niche is deeper than the appliance, select a beam with a larger cross section, or attach two beams. 65
-
 1
1 -
2
-
3
-
4
-
5
-
6
-
7
-
8
-
9
-
10
-
11
-
12
-
13
-
14
-
15
-
16
-
17
-
18
-
19
-
20
-
21
-
22
-
23
-
24
-
25
-
26
-
27
-
28
-
29
-
30
-
31
-
32
-
33
-
34
-
35
-
36
-
37
-
38
-
39
-
40
-
41
-
42
-
43
-
44
-
45
-
46
-
47
-
48
-
49
-
50
-
51
-
52
-
53
-
54
-
55
-
56
-
57
-
58
-
59
-
 60
60 -
 61
61 -
 62
62 -
 63
63 -
 64
64 -
 65
65 -
 66
66 -
 67
67 -
 68
68 -
 69
69 -
 70
70 -
71
-
72
-
73
-
74
-
75
-
76
-
77
-
78
-
79
-
80
-
81
-
82
-
83
-
84
 |
 |
