Miele KF 1911 Vi Operating and Installation manual - Page 70
Preparing the custom door 70, overhead furniture/fixtures.
 |
View all Miele KF 1911 Vi manuals
Add to My Manuals
Save this manual to your list of manuals |
Page 70 highlights
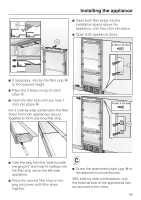
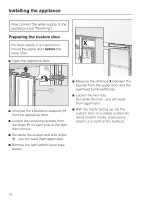
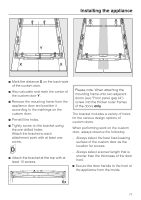
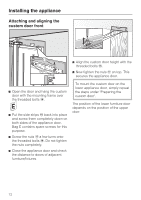
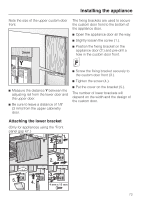
Installing the appliance Now connect the water supply to the appliance (see "Plumbing"). Preparing the custom door For best results, it is important to mount the upper door before the lower door. ^ Open the appliance door. ^ Unscrew the installation supports n from the appliance door. ^ Loosen the remaining screws from the strips o on each side of the door, then remove. ^ Set aside the screws and side strips o - you will need them again later. ^ Remove the light switch cover (see arrow). ^ Measure the distance X between the bracket from the upper door and the overhead furniture/fixtures. ^ Loosen the two nuts. Set aside the nuts - you will need them again later. ^ With the inside facing up, lay the custom door on a stable surface (to avoid scratch marks, place some plastic or a cloth on the surface). 70
-
 1
1 -
2
-
3
-
4
-
5
-
6
-
7
-
8
-
9
-
10
-
11
-
12
-
13
-
14
-
15
-
16
-
17
-
18
-
19
-
20
-
21
-
22
-
23
-
24
-
25
-
26
-
27
-
28
-
29
-
30
-
31
-
32
-
33
-
34
-
35
-
36
-
37
-
38
-
39
-
40
-
41
-
42
-
43
-
44
-
45
-
46
-
47
-
48
-
49
-
50
-
51
-
52
-
53
-
54
-
55
-
56
-
57
-
58
-
59
-
60
-
61
-
62
-
63
-
64
-
 65
65 -
 66
66 -
 67
67 -
 68
68 -
 69
69 -
 70
70 -
 71
71 -
 72
72 -
 73
73 -
 74
74 -
 75
75 -
76
-
77
-
78
-
79
-
80
-
81
-
82
-
83
-
84
 |
 |
