NEC LT240GOV User Manual - Page 13
USB Port Type B
 |
View all NEC LT240GOV manuals
Add to My Manuals
Save this manual to your list of manuals |
Page 13 highlights
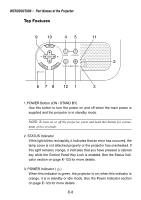
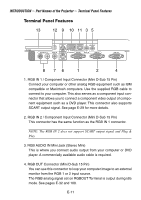
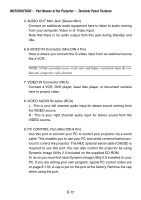
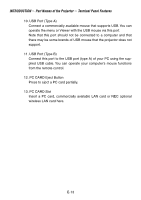
INTRODUCTION Ͼ Part Names of the Projector Ͼ Terminal Panel Features 10. USB Port (Type A) Connect a commercially available mouse that supports USB. You can operate the menu or Viewer with the USB mouse via this port. Note that this port should not be connected to a computer and that there may be some brands of USB mouse that the projector does not support. 11. USB Port (Type B) Connect this port to the USB port (type A) of your PC using the supplied USB cable. You can operate your computer's mouse functions from the remote control. 12. PC CARD Eject Button Press to eject a PC card partially. 13. PC CARD Slot Insert a PC card, commercially available LAN card or NEC optional wireless LAN card here. E-13
-
 1
1 -
2
-
3
-
4
-
5
-
6
-
7
-
 8
8 -
 9
9 -
 10
10 -
 11
11 -
 12
12 -
 13
13 -
 14
14 -
 15
15 -
 16
16 -
 17
17 -
 18
18 -
19
-
20
-
21
-
22
-
23
-
24
-
25
-
26
-
27
-
28
-
29
-
30
-
31
-
32
-
33
-
34
-
35
-
36
-
37
-
38
-
39
-
40
-
41
-
42
-
43
-
44
-
45
-
46
-
47
-
48
-
49
-
50
-
51
-
52
-
53
-
54
-
55
-
56
-
57
-
58
-
59
-
60
-
61
-
62
-
63
-
64
-
65
-
66
-
67
-
68
-
69
-
70
-
71
-
72
-
73
-
74
-
75
-
76
-
77
-
78
-
79
-
80
-
81
-
82
-
83
-
84
-
85
-
86
-
87
-
88
-
89
-
90
-
91
-
92
-
93
-
94
-
95
-
96
-
97
-
98
-
99
-
100
-
101
-
102
-
103
-
104
-
105
-
106
-
107
-
108
-
109
-
110
-
111
-
112
-
113
-
114
-
115
-
116
-
117
-
118
-
119
-
120
-
121
-
122
-
123
-
124
-
125
-
126
-
127
-
128
-
129
-
130
-
131
-
132
-
133
-
134
-
135
-
136
-
137
-
138
-
139
-
140
-
141
-
142
-
143
-
144
-
145
-
146
-
147
-
148
-
149
 |
 |

E-13
10. USB Port (Type A)
Connect a commercially available mouse that supports USB. You can
operate the menu or Viewer with the USB mouse via this port.
Note that this port should not be connected to a computer and that
there may be some brands of USB mouse that the projector does not
support.
11. USB Port (Type B)
Connect this port to the USB port (type A) of your PC using the sup-
plied USB cable. You can operate your computer's mouse functions
from the remote control.
12. PC CARD Eject Button
Press to eject a PC card partially.
13. PC CARD Slot
Insert a PC card, commercially available LAN card or NEC optional
wireless LAN card here.
INTRODUCTION
±
Part Names of the Projector
±
Terminal Panel Features