NEC LT240GOV User Manual - Page 9
INTRODUCTION, Part Names of the Projector, Top Features, PC CARD Access Indicator
 |
View all NEC LT240GOV manuals
Add to My Manuals
Save this manual to your list of manuals |
Page 9 highlights
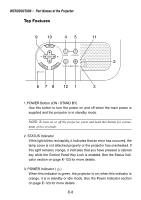
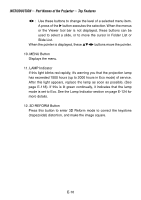
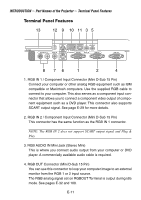
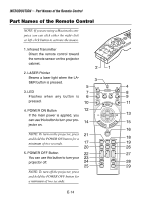
INTRODUCTION Ͼ Part Names of the Projector Ͼ Top Features 4. SOURCE Button Use this button to select a video source such as a PC, VCR, DVD player, Viewer (PC card), or LAN. Press and release this button quickly to display the Source List. Each time this button is pressed for a minimum of TWO seconds, the input source will change as follows: RGB1 → RGB2 → Video → S-Video → Viewer → RGB1 → ... If no input signal is present, the input will be skipped. 5. AUTO ADJUST Button Use this button to adjust Position-H/V and Pixel Clock/Phase for an optimal picture. Some signals may not be displayed correctly or take time to switch between sources. 6. PC CARD Access Indicator Lights while accessing a PC card. 7. ENTER Button Executes your menu selection and activates items selected from the menu. 8. CANCEL Button Press this button to exit "Menus". Press this button to return the adjustments to the last condition while you are in the adjustment or setting menu. 9. SELECT Volume Buttons ̆̄ : Use these buttons to select the menu of the item you wish to adjust. When no menus appear, these buttons work as a volume control. E-9
-
 1
1 -
2
-
3
-
 4
4 -
 5
5 -
 6
6 -
 7
7 -
 8
8 -
 9
9 -
 10
10 -
 11
11 -
 12
12 -
 13
13 -
 14
14 -
15
-
16
-
17
-
18
-
19
-
20
-
21
-
22
-
23
-
24
-
25
-
26
-
27
-
28
-
29
-
30
-
31
-
32
-
33
-
34
-
35
-
36
-
37
-
38
-
39
-
40
-
41
-
42
-
43
-
44
-
45
-
46
-
47
-
48
-
49
-
50
-
51
-
52
-
53
-
54
-
55
-
56
-
57
-
58
-
59
-
60
-
61
-
62
-
63
-
64
-
65
-
66
-
67
-
68
-
69
-
70
-
71
-
72
-
73
-
74
-
75
-
76
-
77
-
78
-
79
-
80
-
81
-
82
-
83
-
84
-
85
-
86
-
87
-
88
-
89
-
90
-
91
-
92
-
93
-
94
-
95
-
96
-
97
-
98
-
99
-
100
-
101
-
102
-
103
-
104
-
105
-
106
-
107
-
108
-
109
-
110
-
111
-
112
-
113
-
114
-
115
-
116
-
117
-
118
-
119
-
120
-
121
-
122
-
123
-
124
-
125
-
126
-
127
-
128
-
129
-
130
-
131
-
132
-
133
-
134
-
135
-
136
-
137
-
138
-
139
-
140
-
141
-
142
-
143
-
144
-
145
-
146
-
147
-
148
-
149
 |
 |
