NEC MD322C8 Users Manual - Page 10
C.1, English-8
 |
View all NEC MD322C8 manuals
Add to My Manuals
Save this manual to your list of manuals |
Page 10 highlights
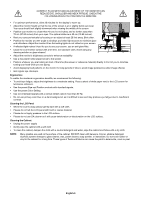
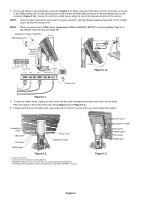
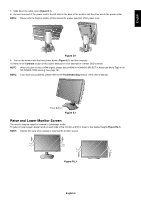
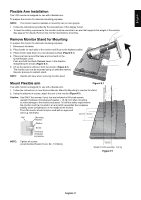
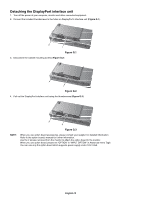
4. Connect all cables to the appropriate connectors (Figure C.1). When using the USB cable, connect the B type connector to the USB upstream port on the right back side of the monitor and the A type connector to the downstream port on the computer (Figure C.1a). If using the cord from a USB device, plug into one of the downstream ports of the monitor. NOTE: Incorrect cable connections may result in irregular operation, damage display quality/components of LCD module and/or shorten the module's life. NOTE: When you plan to use a HDMI signal, please select HDMI in HDMI/DVI SELECT in Advanced Menu Tag9 or on NO SIGNAL OSD warning (see page 18). DisplayPort (DISPLAYPORT2)*3 USB downstream*2 30° Tilt A Type A Type Highest Stand Position B Type USB upstream2 USB upstream1 USB downstream DVI-D HDMI DVI-D Headphone DisplayPort (DISPLAYPORT1) B Type Figure C.1a Power cord Figure C.1 5. To keep the cables neatly organized, place them into the cable management system that is built into the stand. Place the cables in the hooks firmly and evenly (Figure C.2 and Figure C.3). 6. Please check that you can still rotate, raise and lower the monitor screen when you have installed the cables. DisplayPort Cable USB Cable DVI Cable HDMI Cable*1 Power Cord DisplayPort Cable Figure C.2 *1: Cable not included. *2: Connect sensor to this port for self calibration. *3: DisplayPort signal from this connector does not support 3840 x 2160 60 Hz itself. For DisplayPort signal 3840 x 2160 at 60 Hz please use the DISPLAYPORT1 connector. Power Cord DisplayPort Cable DVI Cable HDMI Cable*1 DVI Cable USB Cable Figure C.3 English-8
-
 1
1 -
2
-
3
-
4
-
 5
5 -
 6
6 -
 7
7 -
 8
8 -
 9
9 -
 10
10 -
 11
11 -
 12
12 -
 13
13 -
 14
14 -
 15
15 -
16
-
17
-
18
-
19
-
20
-
21
-
22
-
23
-
24
-
25
-
26
-
27
-
28
-
29
-
30
-
31
-
32
-
33
-
34
-
35
-
36
-
37
-
38
 |
 |
