NEC MD322C8 Users Manual - Page 37
DICOM Measurement
 |
View all NEC MD322C8 manuals
Add to My Manuals
Save this manual to your list of manuals |
Page 37 highlights
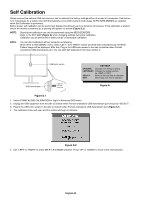
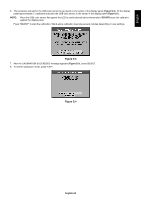
English 8. Press SELECT to start the confirmation of white point. 9. After the confirmation is finished, FINE TUNING MODE message appears. 10. At the FINE TUNING MODE message (Figure C.6), press SELECT if the copy result is satisfactory. If the copy result is unsatisfactory, manually fine tune the white point using the "LEFT" and "RIGHT" buttons, and press SELECT. 11. To end the calibration mode, press "EXIT". Figure C.6 DICOM Measurement 1. Use "LEFT" or "RIGHT" to select DICOM MEASURE in the MODE selection (Figure D.1). 2. Select the PICTURE MODE that you want to measure and press SELECT. NOTE: This function is effective only if GAMMA (Advanced menu Tag1) is DICOM or PROGRAMMABLE. 3. The procedure will ask for the USB color sensor to be placed on the center of the display panel (Figure S.2). Tilt the display panel approximately 5° backward and place the USB color sensor in the center of the display panel (Figure S.1). NOTE: Place the USB color sensor flat against the display to avoid external light contamination. Do not press the USB color sensor against the display panel. Press "SELECT". 4. After the DICOM MEASURED RESULT message appears (Figure D.2). You can set DATE and TIME using control keys, and press SELECT 5. To end the calibration mode, press "EXIT". Figure D.1 Figure D.2 English-35
-
 1
1 -
2
-
3
-
4
-
5
-
6
-
7
-
8
-
9
-
10
-
11
-
12
-
13
-
14
-
15
-
16
-
17
-
18
-
19
-
20
-
21
-
22
-
23
-
24
-
25
-
26
-
27
-
28
-
29
-
30
-
31
-
 32
32 -
 33
33 -
 34
34 -
 35
35 -
 36
36 -
 37
37 -
 38
38
 |
 |
