NEC NP-M322X User's Manual - Page 50
Convenient Features, Step 1: Install Virtual Remote Tool on the computer
 |
View all NEC NP-M322X manuals
Add to My Manuals
Save this manual to your list of manuals |
Page 50 highlights
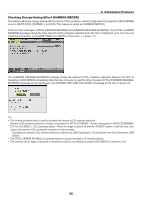
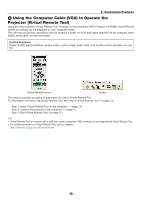
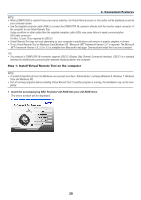
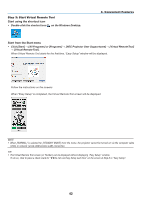
3. Convenient Features NOTE: • When [COMPUTER] is selected from your source selection, the Virtual Remote screen or the toolbar will be displayed as well as your computer screen. • Use the supplied computer cable (VGA) to connect the COMPUTER IN connector directly with the monitor output connector of the computer to use Virtual Remote Tool. Using a switcher or other cables than the supplied computer cable (VGA) may cause failure in signal communication. VGA cable connector: Pin Nos. 12 and 15 are required for DDC/CI. • Virtual Remote Tool may not work depending on your computer's specifications and version of graphic adapters or drivers. • To run Virtual Remote Tool on Windows 8 and Windows XP, "Microsoft .NET Framework Version 2.0" is required. The Microsoft .NET Framework Version 2.0, 3.0 or 3.5 is available from Microsoft's web page. Download and install the it on your computer. TIP: • The projector's COMPUTER IN connector supports DDC/CI (Display Data Channel Command Interface). DDC/CI is a standard interface for bidirectional communication between display/projector and computer. Step 1: Install Virtual Remote Tool on the computer NOTE: • To install Virtual Remote Tool, the Windows user account must have "Administrator" privilege (Windows 8, Windows 7, Windows Vista and Windows XP). • Exit all running programs before installing Virtual Remote Tool. If another program is running, the installation may not be completed. 1 Insert the accompanying NEC Projector CD-ROM into your CD-ROM drive. The menu window will be displayed. 39
-
 1
1 -
2
-
3
-
4
-
5
-
6
-
7
-
8
-
9
-
10
-
11
-
12
-
13
-
14
-
15
-
16
-
17
-
18
-
19
-
20
-
21
-
22
-
23
-
24
-
25
-
26
-
27
-
28
-
29
-
30
-
31
-
32
-
33
-
34
-
35
-
36
-
37
-
38
-
39
-
40
-
41
-
42
-
43
-
44
-
 45
45 -
 46
46 -
 47
47 -
 48
48 -
 49
49 -
 50
50 -
 51
51 -
 52
52 -
 53
53 -
 54
54 -
 55
55 -
56
-
57
-
58
-
59
-
60
-
61
-
62
-
63
-
64
-
65
-
66
-
67
-
68
-
69
-
70
-
71
-
72
-
73
-
74
-
75
-
76
-
77
-
78
-
79
-
80
-
81
-
82
-
83
-
84
-
85
-
86
-
87
-
88
-
89
-
90
-
91
-
92
-
93
-
94
-
95
-
96
-
97
-
98
-
99
-
100
-
101
-
102
-
103
-
104
-
105
-
106
-
107
-
108
-
109
-
110
-
111
-
112
-
113
-
114
-
115
-
116
-
117
-
118
-
119
-
120
-
121
-
122
-
123
-
124
-
125
-
126
-
127
-
128
-
129
-
130
-
131
-
132
-
133
-
134
-
135
-
136
-
137
-
138
-
139
-
140
-
141
-
142
-
143
-
144
-
145
-
146
-
147
-
148
-
149
-
150
-
151
-
152
-
153
-
154
-
155
-
156
-
157
-
158
-
159
-
160
-
161
-
162
-
163
 |
 |