NEC NP-P451X User's Manual - Page 196
Basic Operation of Image Express Utility 2.0, User Supportware
 |
View all NEC NP-P451X manuals
Add to My Manuals
Save this manual to your list of manuals |
Page 196 highlights
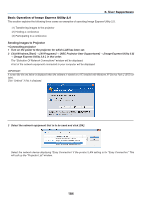
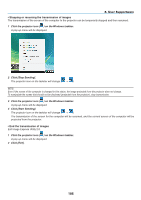
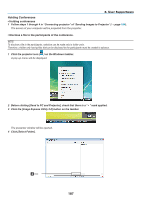
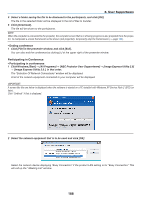
8. User Supportware Basic Operation of Image Express Utility 2.0 This section explains the following three cases as examples of operating Image Express Utility 2.0. (1) Transferring images to the projector (2) Holding a conference (3) Participating in a conference Sending Images to Projector • Connecting projector 1 Turn on the power to the projector for which LAN has been set. 2 Click Windows [Start] → [All Programs] → [NEC Projector User Supportware] → [Image Express Utility 2.0] → [Image Express Utility 2.0 ], in that order. The "Selection Of Network Connections" window will be displayed. A list of the network equipment connected to your computer will be displayed. IMPORTANT: A screen like the one below is displayed when the software is started on a PC installed with Windows XP Service Pack 2 (SP2) (or later). Click "Unblock" if this is displayed. 3 Select the network equipment that is to be used and click [OK]. Select the network device displaying "Easy Connection" if the product LAN setting is for "Easy Connection." This will call up the "Projector List" window. 184
-
 1
1 -
2
-
3
-
4
-
5
-
6
-
7
-
8
-
9
-
10
-
11
-
12
-
13
-
14
-
15
-
16
-
17
-
18
-
19
-
20
-
21
-
22
-
23
-
24
-
25
-
26
-
27
-
28
-
29
-
30
-
31
-
32
-
33
-
34
-
35
-
36
-
37
-
38
-
39
-
40
-
41
-
42
-
43
-
44
-
45
-
46
-
47
-
48
-
49
-
50
-
51
-
52
-
53
-
54
-
55
-
56
-
57
-
58
-
59
-
60
-
61
-
62
-
63
-
64
-
65
-
66
-
67
-
68
-
69
-
70
-
71
-
72
-
73
-
74
-
75
-
76
-
77
-
78
-
79
-
80
-
81
-
82
-
83
-
84
-
85
-
86
-
87
-
88
-
89
-
90
-
91
-
92
-
93
-
94
-
95
-
96
-
97
-
98
-
99
-
100
-
101
-
102
-
103
-
104
-
105
-
106
-
107
-
108
-
109
-
110
-
111
-
112
-
113
-
114
-
115
-
116
-
117
-
118
-
119
-
120
-
121
-
122
-
123
-
124
-
125
-
126
-
127
-
128
-
129
-
130
-
131
-
132
-
133
-
134
-
135
-
136
-
137
-
138
-
139
-
140
-
141
-
142
-
143
-
144
-
145
-
146
-
147
-
148
-
149
-
150
-
151
-
152
-
153
-
154
-
155
-
156
-
157
-
158
-
159
-
160
-
161
-
162
-
163
-
164
-
165
-
166
-
167
-
168
-
169
-
170
-
171
-
172
-
173
-
174
-
175
-
176
-
177
-
178
-
179
-
180
-
181
-
182
-
183
-
184
-
185
-
186
-
187
-
188
-
189
-
190
-
 191
191 -
 192
192 -
 193
193 -
 194
194 -
 195
195 -
 196
196 -
 197
197 -
 198
198 -
 199
199 -
 200
200 -
 201
201 -
202
-
203
-
204
-
205
-
206
-
207
-
208
-
209
-
210
-
211
-
212
-
213
-
214
-
215
-
216
-
217
-
218
-
219
-
220
-
221
-
222
-
223
-
224
-
225
-
226
-
227
-
228
-
229
-
230
-
231
 |
 |
