NEC PX-42VP1A 42PD1/50PD1 - Page 42
Program Menu, Oct30, Jan01, Video
 |
View all NEC PX-42VP1A manuals
Add to My Manuals
Save this manual to your list of manuals |
Page 42 highlights
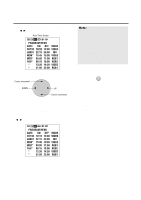
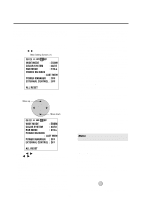
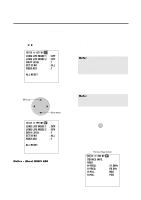
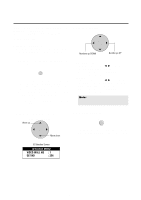
8. Align the cursor with the ON/OFF time and set with the ᮤ / ᮣ button. Auto Timer Screen PROGRAM MENU DATE ON OFF MODE OCT30 10:10 13:00 VIDEO JAN01 22:15 24:00 INV MON* 15:45 19:00 VIDEO WED* 09:00 11:00 RGB1 THU* 08:15 10:00 RGB2 * 13:30 14:30 VIDEO * 21:00 22:00 RGB1 POSITION / CONTROL Cursor movement DOWN UP Cursor movement * The ON/OFF time is moved one digit at a time with the up and down cursors, and the left and right buttons change the number UP and DOWN. 9. Align the cursor with the MODE and set with the ᮤ / ᮣ button. PROGRAM MENU DATE ON OFF MODE OCT30 10:10 13:00 VIDEO JAN01 22:15 24:00 INV MON* 15:45 19:00 VIDEO WED* 09:00 11:00 RGB1 THU* 08:15 10:00 RGB2 * 13:30 14:30 VIDEO * 21:00 22:00 RGB1 Note: •In the INV selection, the input mode starts up in the last memory. INV provides an inverse video screen display for reducing burn-in. The input mode at this time will be the input mode of the last memory. •Set AUTO PICTURE to "OFF" when using "INV". If AUTO PICTURE is set to "ON" when using "INV", the picture display position moves and the "INV" function may not have the proper effect. "INV" cannot be set for RGB3. 10. Return to the main menu EXIT * To delete the main menu, press the EXIT button once more. * When the cursor is in the DATE position, a press of the remote control CLEAR button will clear only that program. (The CLEAR button is valid only when the cursor is in the DATE position.) * The function can be used in up to 7 programs and the program contents of a program will be deleted after exiting the program. * When the Timer function is set, the POWER/ STANDBY indicator is blinking orange at intervals of 3 seconds. * The left and right buttons change the following input modes: VIDEO, RGB1 through RGB3, INV 42
-
 1
1 -
2
-
3
-
4
-
5
-
6
-
7
-
8
-
9
-
10
-
11
-
12
-
13
-
14
-
15
-
16
-
17
-
18
-
19
-
20
-
21
-
22
-
23
-
24
-
25
-
26
-
27
-
28
-
29
-
30
-
31
-
32
-
33
-
34
-
35
-
36
-
 37
37 -
 38
38 -
 39
39 -
 40
40 -
 41
41 -
 42
42 -
 43
43 -
 44
44 -
 45
45 -
 46
46 -
 47
47 -
48
-
49
-
50
-
51
-
52
-
53
-
54
-
55
-
56
-
57
-
58
-
59
-
60
-
61
-
62
-
63
-
64
 |
 |
