NEC PX-42VP1A 42PD1/50PD1 - Page 45
Long Life Mode 1, Long Life Mode 2, Gray Level, Set Id No, Rgb3 Adj, All Reset, Source Info., H-freq - plasma
 |
View all NEC PX-42VP1A manuals
Add to My Manuals
Save this manual to your list of manuals |
Page 45 highlights
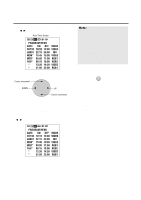
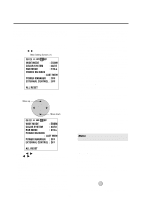
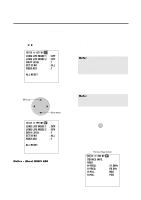
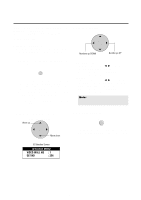
Other Setting Screens (2) This allows the following settings: LONG LIFE MODE 1/ 2, GRAY LEVEL, SET ID NO, and ALL RESET. 1. Align the cursor with icon (14) of the second page. The cursor is moved left and right with the POSITION CONTROLᮤ / ᮣ buttons. Icon (14) LONG LIFE MODE 1 LONG LIFE MODE 2 GRAY LEVEL SET ID NO RGB3 ADJ : OFF : OFF : 1 : ALL : 1 ALL RESET 2. Align the cursor with the desired item POSITION / CONTROL Move up 3. Press the v / w buttons and set Select the various items with the left and right buttons Burning reduction function * LONG LIFE MODE 1: Switched ON/OFF with the left and right buttons. (Initial value is OFF) → Holds down the brightness of the screen. * LONG LIFE MODE 2: Switched ON/OFF with the left and right buttons. (Initial value is OFF) → Moves the screen up, down, left, and right at fixed times. Note: The long life mode is designed to extend the service life of the plasma panel and reduce ghost images. It is not meant to prevent ghost images. LONG LIFE MODE 2 cannot be set with multiple screens operation. * GRAY LEVEL: Select 1 to 3 with the left and right buttons. (Initial value is 1) → Adjusts the brightness of the non-displayed portion of the screen. * SET ID No.: Select 1 to 256 with the left and right buttons. (Initial value is ALL) → Displays ALL with the remote control or CLEAR button. Note: Selecting ALL RESET and pressing the PROCEED button will display a warning screen and pressing "PROCEED" further will change all the settings of this screen to the initial values. Move down 4. Return to the main menu LONG LIFE MODE 1 LONG LIFE MODE 2 GRAY LEVEL SET ID NO RGB3 ADJ : OFF : OFF : 1 : ALL : 1 ALL RESET Notice - About RGB3 ADJ If the image is not stable when in the RGB3 input mode, switch the "RGB3 ADJ" number to 2 or 3. (Select the mode at which the display is stable.) The display position will change when the number is changed; therefore, when using the unit with "AUTO PICTURE" ON, switch it OFF and then back ON again to return the display position to its original location. When using the unit with "AUTO PICTURE" OFF, please perform the display position adjustment again. EXIT * To delete the main menu, press the EXIT button once more. * Align the cursor with icon (9) at the very top to move to the first page menu screen. Icon (9) Previous Page Screen SOURCE INFO. RGB1 H-FREQ. V-FREQ. H-POL. V-POL. 31.5kHz 60.0Hz NEG POS 45
-
 1
1 -
2
-
3
-
4
-
5
-
6
-
7
-
8
-
9
-
10
-
11
-
12
-
13
-
14
-
15
-
16
-
17
-
18
-
19
-
20
-
21
-
22
-
23
-
24
-
25
-
26
-
27
-
28
-
29
-
30
-
31
-
32
-
33
-
34
-
35
-
36
-
37
-
38
-
39
-
 40
40 -
 41
41 -
 42
42 -
 43
43 -
 44
44 -
 45
45 -
 46
46 -
 47
47 -
 48
48 -
 49
49 -
 50
50 -
51
-
52
-
53
-
54
-
55
-
56
-
57
-
58
-
59
-
60
-
61
-
62
-
63
-
64
 |
 |
