NEC PX-50XM6A 42XM5/50XM6/60XM5 UM - Page 32
To set MULTI INPUT, To set, REP.1~3, to the FUNC., PROGRAM TIMER settings, To reset the program,
 |
View all NEC PX-50XM6A manuals
Add to My Manuals
Save this manual to your list of manuals |
Page 32 highlights
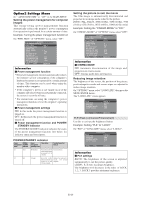
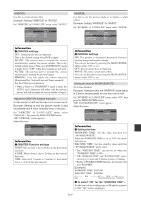
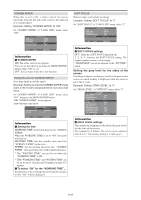
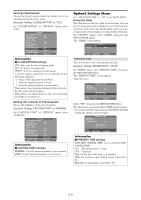
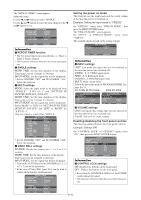
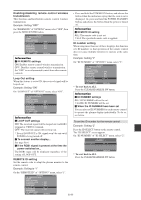
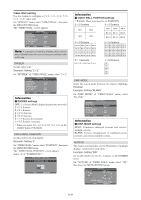
PROGRAM TIMER This sets the day and time at which the power will be switched ON/OFF as well as the input mode. Example 1: Setting so that the power will be switched on at 8:30 A.M., Monday, displaying RGB2 source, and switched off at 10:30 A.M. On "TIMER" menu, select "PROGRAM", then press the MENU/ENTER button. The "PROGRAM TIMER" screen appears. Adjust the items. Use the LM and ᮤ ᮣ buttons to move the cursor. Each mode switches each time the ZOOM button is pressed. Depending on the selected INPUT or FUNC., press the MENU/ENTER button to make advanced settings. PROGRAM TIMER DAY 1 MON 2- 3- 4- 5- 6- 7- 8- 9- 10 - ON 08 : 30 OFF 10 : 30 INPUT RGB2 FUNC. INV Ⅵ Special characters in the PROGRAM TIMER screen When the setting item includes gray indication, it does not function under the timer's setting. PROGRAM TIMER DAY 1 MON 2 TUE 3 SAT 4 *FRI 5- 6 SAT 7* 8- ON 08 : 30 - - : - 08 : 30 08 : 30 - - : - 08 : 30 15 : 30 - - : - - OFF 10 : 30 18 : 15 12 : 15 10 : 00 - - : - 12 : 15 16 : 00 - - : - - INPUT RGB2 - VIDEO1 DVD1 - - RGB1 - FUNC. INV. - WHITE - - REP.1 - - • An asterisk "*" in the DAY field An asterisk "*" means "every" or "everyday". For example, "*FRI" means "every Friday". If you enter "*" only, it means "everyday". • A hyphen "-" in the ON field or OFF field You have to set at least the ON field or OFF field to activate the program timer. • A hyphen "-" in the INPUT and FUNC. field A hyphen "-" in the INPUT field means the last mode. When you set "REP.1~3" in the FUNC. field, the INPUT field is set to "-". Ⅵ To set MULTI INPUT SEL. ZOOM ADJ. EXIT OK Example 2: Setting so that the power will be switched on at 8:00 A.M., Monday, displaying the VIDEO1 input, display the RGB1 input at 9:00 A.M., display in WHITE at 10:00 A.M., then switched off at 11:00 A.M. PROGRAM 1 PROGRAM 2 PROGRAM 3 8:00 VIDEO1 9:00 10:00 ON RGB1 11:00 WHITE OFF PROGRAM TIMER • Set the INPUT field to "MULTI", then press the MENU/ENTER button. The "MULTI SCREEN SETTING" will appear on the screen. • Use the L and M buttons to select "MULTI MODE", then use the ᮤ and ᮣ buttons to choose from "SINGLE", "SIDE BY SIDE1~3" and "PICTURE IN PICTURE (BOTTOM LEFT~TOP LEFT)". • Use the L and M buttons to select "MAIN"/ "SUB" and "LEFT"/"RIGHT", then use the ᮤ and ᮣ buttons to choose from "VIDEO1~3", "DVD1~2" and "RGB1~3". DAY 1 MON 2 MON 3 MON 4- ON 08 : 00 09 : 00 10 : 00 - - : - - OFF 11 : 00 - - : - - INPUT VIDEO1 RGB1 - - FUNC. - - WHITE - * To perform a continuous program, set the OFF time only for the last item. PICTURE IN PICTURE PROGRAM TIMER MULTI SCREEN SETTING MULTI MODE : BOTTOM LEFT INPUT MODE MAIN : RGB1 SUB : VIDEO1 SEL. ADJ. EXIT RETURN SIDE BY SIDE PROGRAM TIMER MULTI SCREEN SETTING MULTI MODE : SIDE BY SIDE1 INPUT MODE LEFT : RGB1 RIGHT : VIDEO1 SEL. ADJ. EXIT RETURN Information Ⅵ PROGRAM TIMER settings DAY: Set the day of the week (e.g. Sunday). ON (hour, minutes): Set the time at which the power will be turned on in the 24-hour format. OFF (hour, minutes): Set the time at which the power will be turned off in the 24-hour format. INPUT: Set the input mode that will be displayed when the power is turned on from "VIDEO1~3", "DVD1~2", "RGB1~3" and "MULTI". FUNC.: Set the function that will be activated after the power is turned on from "ORB.", "INV.", "WHITE", "WIPER" and "REP.1~3". "REP.1~3" cannot be selected when INPUT is set. Ⅵ To reset the program Ⅵ To set "REP.1~3" to the FUNC. • Set the function to "REP.1", "REP.2" or "REP.3", then press the MENU/ENTER button. The "REPEAT TIMER" screen will appear on the screen. • Use the ᮤ and ᮣ buttons to choose from "SINGLE", "MULTI" and "VIDEO-W", then adjust the items. • When you set FUNC. to "REP.1", "REP.2" or "REP.3", you can set "SINGLE", "MULTI" and "VIDEO-W". However, only one of these works depending on the settings of AUTO ID and DIVIDER. See "REPEAT TIMER" on page En-31 for details for the above settings. REPEAT TIMER Align the cursor with the DAY field that you wish to reset, then press the CLEAR/SEAMLESS SW button. This function enables you to display 2 input modes at the set time alternately. Ⅵ To reset the data Example: Setting to display "VIDEO1" for 10 minutes Align the cursor with the field (ON/OFF/INPUT/ and "DVD1" for 15 minutes alternately. FUNC.) that you wish to reset, then press the CLEAR/ On "TIMER" menu, select "REPEAT", then press the SEAMLESS SW button. En-31MENU/ENTER button.
-
 1
1 -
2
-
3
-
4
-
5
-
6
-
7
-
8
-
9
-
10
-
11
-
12
-
13
-
14
-
15
-
16
-
17
-
18
-
19
-
20
-
21
-
22
-
23
-
24
-
25
-
26
-
 27
27 -
 28
28 -
 29
29 -
 30
30 -
 31
31 -
 32
32 -
 33
33 -
 34
34 -
 35
35 -
 36
36 -
 37
37 -
38
-
39
-
40
-
41
-
42
-
43
-
44
-
45
-
46
-
47
-
48
-
49
-
50
-
51
-
52
-
53
-
54
-
55
-
56
-
57
-
58
-
59
-
60
-
61
-
62
-
63
-
64
-
65
-
66
-
67
-
68
-
69
-
70
-
71
-
72
-
73
-
74
-
75
-
76
-
77
-
78
-
79
-
80
-
81
-
82
-
83
-
84
-
85
-
86
-
87
-
88
-
89
-
90
-
91
-
92
-
93
-
94
-
95
-
96
-
97
-
98
-
99
-
100
-
101
-
102
-
103
-
104
-
105
-
106
-
107
-
108
-
109
-
110
-
111
-
112
-
113
-
114
-
115
-
116
-
117
-
118
-
119
-
120
-
121
-
122
-
123
-
124
-
125
-
126
-
127
-
128
-
129
-
130
-
131
-
132
-
133
-
134
-
135
-
136
-
137
-
138
-
139
-
140
-
141
-
142
-
143
-
144
-
145
-
146
-
147
-
148
-
149
-
150
-
151
-
152
-
153
-
154
-
155
-
156
-
157
-
158
-
159
-
160
-
161
-
162
-
163
-
164
-
165
-
166
-
167
-
168
-
169
-
170
-
171
-
172
-
173
-
174
-
175
-
176
-
177
-
178
-
179
-
180
-
181
-
182
-
183
-
184
-
185
-
186
-
187
-
188
-
189
-
190
-
191
-
192
-
193
-
194
-
195
-
196
-
197
-
198
-
199
-
200
-
201
-
202
-
203
 |
 |
