Nady MHT-16 Manual - Page 11
Connecting Audio Output
 |
View all Nady MHT-16 manuals
Add to My Manuals
Save this manual to your list of manuals |
Page 11 highlights
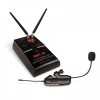
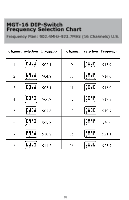
The IR Sync Button (14) on the MGT-16 receiver is used to transfer the selected frequency info from the receiver to the transmitter for quick synchronization prior to use. Begin programming by holding the wireless transmitter's IR Receptor/Sensor Window (21, 31, 46, 56) about 6-12" from the receiver's IR Synch Infrared LED Window (1). Press the IR Sync Button once to begin the IR sync download of the selected frequency to the transmitter. Note: To insure proper synchronization, the transmitter must always be just turned on, or else turned off then on again, before syncing. on or properly positioned) the receiver and the transmitter units do not link and transmitter's previously programmed channel remains unchanged. Note: Only one transmitter can be used with one receiver. It is not possible to use two transmitters on the same frequency and mix the output of these transmitters into one wireless receiver. Note: The IR link is infrared light and works best when this data transfer is accomplished in a light-shielded or darker environment. It may not be successful in a brightly lit area. If the transfer fails, repeat the procedure in a darker location or somehow shield the link from outside light to successfully program the transmitter with the selected channel info from the receiver. Connecting Audio Output MT-16A transmitter pictured. Use same procedure with transmitter model supplied with your system The MGT-16 receiver's Audio Output Jack (7) is a ¼" unbalanced line out and its level is controlled by the Volume Knob (3). Plug an audio cable with a ¼" mono (tip/sleeve) plug into the audio output jack and plug the other end into your pedal board or amplifier/mixer as you would with a direct cord from the instrument or mic. When the Volume knob is set to maximum receiver volume setting, the system audio output is approximately +4dB higher than a direct instrument (or mic)-to-cord-to-amp connection. When the RF Signal LED (10) on the receiver lights up, the system frequency is properly synchronized. To change to a different frequency, reset the Frequency Select DIP Switches (4) and sync the transmitter again to the new selected frequency first, after turning the transmitter off and then on again. If no action is taken during the 10 seconds of active data transfer ( i.e., the transmitter is not turned Note: As when making any connection, make sure the amplifier volume control is set at the minimum level before plugging in the receiver to avoid possible speaker damage. Your MGT-16 receiver is now operational and ready to use. Once you have completed the above steps, proceed to the following instructions for the transmitter model supplied with your system. 11
-
 1
1 -
2
-
3
-
4
-
5
-
 6
6 -
 7
7 -
 8
8 -
 9
9 -
 10
10 -
 11
11 -
 12
12 -
 13
13 -
 14
14 -
 15
15 -
 16
16 -
17
-
18
-
19
-
20
 |
 |
