Netgear FVS124G FVS124G Reference Manual - Page 51
Step 1: Physically Connect the VPN Firewall to Your Network (Required) - software
 |
UPC - 606449040531
View all Netgear FVS124G manuals
Add to My Manuals
Save this manual to your list of manuals |
Page 51 highlights
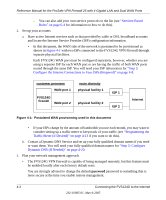
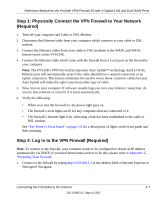
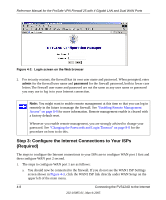
Reference Manual for the ProSafe VPN Firewall 25 with 4 Gigabit LAN and Dual WAN Ports Step 1: Physically Connect the VPN Firewall to Your Network (Required) 1. Turn off your computer and Cable or DSL Modem. 2. Disconnect the Ethernet cable from your computer which connects to your cable or DSL modem. 3. Connect the Ethernet cables from your cable or DSL modems to the WAN1 and WAN2 Internet ports on the FVS124G. 4. Connect the Ethernet cable which came with the firewall from a Local port on the firewall to your computer. Note: The FVS124G VPN Firewall incorporates Auto UplinkTM technology. Each LOCAL Ethernet port will automatically sense if the cable should have a normal connection or an uplink connection. This feature eliminates the need to worry about crossover cables because Auto Uplink will make the right connection either type of cable. 5. Now, turn on your computer. If software usually logs you in to your Internet connection, do not run that software or cancel it if it starts automatically. 6. Verify the following: • When your turn the firewall on, the power light goes on. • The firewall's local lights are lit for any computers that are connected to it. • The firewall's Internet light is lit, indicating a link has been established to the cable or DSL modem. See "The Router's Front Panel" on page 2-6 for a description of lights on the front panel and their meaning. Step 2: Log in to the VPN Firewall (Required) Note: To connect to the firewall, your computer needs to be configured to obtain an IP address automatically via DHCP. If you need instructions on how to do this, please refer to Appendix C, "Preparing Your Network. 1. Connect to the firewall by typing http://192.168.1.1 in the address field of Internet Explorer or Netscape® Navigator. Connecting the FVS124G to the Internet 4-7 202-10085-01, March 2005
-
 1
1 -
2
-
3
-
4
-
5
-
6
-
7
-
8
-
9
-
10
-
11
-
12
-
13
-
14
-
15
-
16
-
17
-
18
-
19
-
20
-
21
-
22
-
23
-
24
-
25
-
26
-
27
-
28
-
29
-
30
-
31
-
32
-
33
-
34
-
35
-
36
-
37
-
38
-
39
-
40
-
41
-
42
-
43
-
44
-
45
-
 46
46 -
 47
47 -
 48
48 -
 49
49 -
 50
50 -
 51
51 -
 52
52 -
 53
53 -
 54
54 -
 55
55 -
 56
56 -
57
-
58
-
59
-
60
-
61
-
62
-
63
-
64
-
65
-
66
-
67
-
68
-
69
-
70
-
71
-
72
-
73
-
74
-
75
-
76
-
77
-
78
-
79
-
80
-
81
-
82
-
83
-
84
-
85
-
86
-
87
-
88
-
89
-
90
-
91
-
92
-
93
-
94
-
95
-
96
-
97
-
98
-
99
-
100
-
101
-
102
-
103
-
104
-
105
-
106
-
107
-
108
-
109
-
110
-
111
-
112
-
113
-
114
-
115
-
116
-
117
-
118
-
119
-
120
-
121
-
122
-
123
-
124
-
125
-
126
-
127
-
128
-
129
-
130
-
131
-
132
-
133
-
134
-
135
-
136
-
137
-
138
-
139
-
140
-
141
-
142
-
143
-
144
-
145
-
146
-
147
-
148
-
149
-
150
-
151
-
152
-
153
-
154
-
155
-
156
-
157
-
158
-
159
-
160
-
161
-
162
-
163
-
164
-
165
-
166
-
167
-
168
-
169
-
170
-
171
-
172
-
173
-
174
-
175
-
176
-
177
-
178
-
179
-
180
-
181
-
182
-
183
-
184
-
185
-
186
-
187
-
188
-
189
-
190
-
191
-
192
-
193
-
194
-
195
-
196
-
197
-
198
-
199
-
200
-
201
-
202
-
203
-
204
-
205
-
206
-
207
-
208
-
209
-
210
-
211
-
212
-
213
-
214
-
215
-
216
-
217
-
218
-
219
-
220
-
221
-
222
-
223
-
224
-
225
-
226
-
227
-
228
-
229
-
230
-
231
-
232
-
233
-
234
-
235
-
236
-
237
-
238
 |
 |
