Netgear FVS124G FVS124G Reference Manual - Page 52
Step 3: Con the Internet Connections to Your ISPs (Required)
 |
UPC - 606449040531
View all Netgear FVS124G manuals
Add to My Manuals
Save this manual to your list of manuals |
Page 52 highlights
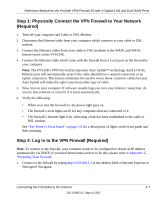
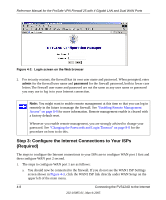
Reference Manual for the ProSafe VPN Firewall 25 with 4 Gigabit LAN and Dual WAN Ports Figure 4-2: Login screen on the Web browser 2. For security reasons, the firewall has its own user name and password. When prompted, enter admin for the firewall user name and password for the firewall password, both in lower case letters.The firewall user name and password are not the same as any user name or password you may use to log in to your Internet connection. Note: You might want to enable remote management at this time so that you can log in remotely in the future to manage the firewall. See "Enabling Remote Management Access" on page 8-9 for more information. Remote management enable is cleared with a factory default reset. Whenever you enable remote management, you are strongly advised to change your password. See "Changing the Passwords and Login Timeout" on page 8-8 for the procedure on how to do this. Step 3: Configure the Internet Connections to Your ISPs (Required) The steps to configure the Internet connections to your ISPs are to configure WAN port 1 first and then configure WAN port 2 second. 1. The steps to configure WAN port 1 are as follows: a. You should now be connected to the firewall. If you do not see the WAN1 ISP Settings screen shown in Figure 4-3, click the WAN1 ISP link directly under WAN Setup on the upper left of the main menu. 4-8 Connecting the FVS124G to the Internet 202-10085-01, March 2005
-
 1
1 -
2
-
3
-
4
-
5
-
6
-
7
-
8
-
9
-
10
-
11
-
12
-
13
-
14
-
15
-
16
-
17
-
18
-
19
-
20
-
21
-
22
-
23
-
24
-
25
-
26
-
27
-
28
-
29
-
30
-
31
-
32
-
33
-
34
-
35
-
36
-
37
-
38
-
39
-
40
-
41
-
42
-
43
-
44
-
45
-
46
-
 47
47 -
 48
48 -
 49
49 -
 50
50 -
 51
51 -
 52
52 -
 53
53 -
 54
54 -
 55
55 -
 56
56 -
 57
57 -
58
-
59
-
60
-
61
-
62
-
63
-
64
-
65
-
66
-
67
-
68
-
69
-
70
-
71
-
72
-
73
-
74
-
75
-
76
-
77
-
78
-
79
-
80
-
81
-
82
-
83
-
84
-
85
-
86
-
87
-
88
-
89
-
90
-
91
-
92
-
93
-
94
-
95
-
96
-
97
-
98
-
99
-
100
-
101
-
102
-
103
-
104
-
105
-
106
-
107
-
108
-
109
-
110
-
111
-
112
-
113
-
114
-
115
-
116
-
117
-
118
-
119
-
120
-
121
-
122
-
123
-
124
-
125
-
126
-
127
-
128
-
129
-
130
-
131
-
132
-
133
-
134
-
135
-
136
-
137
-
138
-
139
-
140
-
141
-
142
-
143
-
144
-
145
-
146
-
147
-
148
-
149
-
150
-
151
-
152
-
153
-
154
-
155
-
156
-
157
-
158
-
159
-
160
-
161
-
162
-
163
-
164
-
165
-
166
-
167
-
168
-
169
-
170
-
171
-
172
-
173
-
174
-
175
-
176
-
177
-
178
-
179
-
180
-
181
-
182
-
183
-
184
-
185
-
186
-
187
-
188
-
189
-
190
-
191
-
192
-
193
-
194
-
195
-
196
-
197
-
198
-
199
-
200
-
201
-
202
-
203
-
204
-
205
-
206
-
207
-
208
-
209
-
210
-
211
-
212
-
213
-
214
-
215
-
216
-
217
-
218
-
219
-
220
-
221
-
222
-
223
-
224
-
225
-
226
-
227
-
228
-
229
-
230
-
231
-
232
-
233
-
234
-
235
-
236
-
237
-
238
 |
 |
