Contents
|
3
Contents
Chapter 1
Introduction
Overview . . . . . . . . . . . . . . . . . . . . . . . . . . . . . . . . . . . . . . . . . . . . . . . . . . . 6
Features . . . . . . . . . . . . . . . . . . . . . . . . . . . . . . . . . . . . . . . . . . . . . . . . . . . 6
Package Contents . . . . . . . . . . . . . . . . . . . . . . . . . . . . . . . . . . . . . . . . . . . . 8
Chapter 2
Physical Description
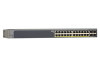
GS752TP Front Panel and Back Panel Configuration. . . . . . . . . . . . . . . . 10
GS728TP Front Panel and Back Panel Configuration. . . . . . . . . . . . . . . . 11
GS728TPP Front Panel and Back Panel Configuration . . . . . . . . . . . . . . 12
LED Designations . . . . . . . . . . . . . . . . . . . . . . . . . . . . . . . . . . . . . . . . . . . 14
Port LEDs . . . . . . . . . . . . . . . . . . . . . . . . . . . . . . . . . . . . . . . . . . . . . . . 14
System LEDs. . . . . . . . . . . . . . . . . . . . . . . . . . . . . . . . . . . . . . . . . . . . . 15
Device Hardware Interfaces . . . . . . . . . . . . . . . . . . . . . . . . . . . . . . . . . . . 16
RJ-45 Ports . . . . . . . . . . . . . . . . . . . . . . . . . . . . . . . . . . . . . . . . . . . . . . 16
SFP Ports . . . . . . . . . . . . . . . . . . . . . . . . . . . . . . . . . . . . . . . . . . . . . . . 16
Reset Button . . . . . . . . . . . . . . . . . . . . . . . . . . . . . . . . . . . . . . . . . . . . . 17
Factory Defaults Button . . . . . . . . . . . . . . . . . . . . . . . . . . . . . . . . . . . . . 17
Select Button . . . . . . . . . . . . . . . . . . . . . . . . . . . . . . . . . . . . . . . . . . . . . 17
Chapter 3
Applications
Desktop Switching . . . . . . . . . . . . . . . . . . . . . . . . . . . . . . . . . . . . . . . . . . . 19
Backbone Switching . . . . . . . . . . . . . . . . . . . . . . . . . . . . . . . . . . . . . . . . . 20
Chapter 4
Installation
Step 1: Prepare the Site . . . . . . . . . . . . . . . . . . . . . . . . . . . . . . . . . . . . . . 22
Step 2: Install the Switch . . . . . . . . . . . . . . . . . . . . . . . . . . . . . . . . . . . . . . 22
Install the Switch on a Flat Surface . . . . . . . . . . . . . . . . . . . . . . . . . . . . 22
Install the Switch in a Rack . . . . . . . . . . . . . . . . . . . . . . . . . . . . . . . . . . 22
Step 3: Check the Installation . . . . . . . . . . . . . . . . . . . . . . . . . . . . . . . . . . 23
Step 4: Connect Devices to the Switch . . . . . . . . . . . . . . . . . . . . . . . . . . . 24
Step 5: Install an SFP Transceiver Module . . . . . . . . . . . . . . . . . . . . . . . . 24
Step 6: Apply AC Power . . . . . . . . . . . . . . . . . . . . . . . . . . . . . . . . . . . . . . 25
Step 7: Apply RPS DC Power . . . . . . . . . . . . . . . . . . . . . . . . . . . . . . . . . . 25
Step 8: Manage the Switch Using a Web Browser or the Computer Utility 26
 1
1 2
2 3
3 4
4 5
5 6
6 7
7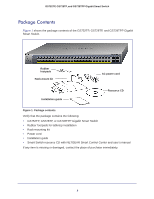 8
8 9
9