Netgear PS111W PS111W Installation Guide - Page 12
Windows 95 or Windows 98 Users, Windows NT Users - driver
 |
UPC - 606449023459
View all Netgear PS111W manuals
Add to My Manuals
Save this manual to your list of manuals |
Page 12 highlights
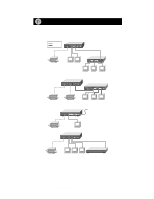
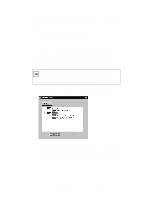
6. Click on "OK" when the "Add Port" screen appears, informing you that you have successfully added the port. If you are a Windows 95 or Windows 98 user, take note of this port number (the number is written as "PSxxxxxx_P1" or "PSxxxxxx_P2"). You will need this information for step 3 in the next section. The next sections are written for Windows 95 or Windows 98 users and for Windows NT users, respectively. Follow the appropriate instructions, and continue to the final section ("Complete the Setup Process") to conclude the setup procedure. Windows 95 or Windows 98 Users 1. Click on "Next" after clicking on the Manufacturer and Printer Model you are adding in the "Add Printer Wizard" screen. If your printer is not listed, click on "Have Disk" and insert the driver disk that you received from the printer manufacturer. Install the driver, proceeding as instructed until the "Add Printer Wizard" window opens. 2. If you have already installed the printer driver, select "Keep existing driver" and click on "Next." If you have not installed the driver, do so now as prompted by the screen. 3. Click on the "PSxxxxxxx_P1 (or PSxxxxxx_P2) Netgear Print Server" that you selected in step 6 when the next "Add Printer Wizard" appears, and click on "Next." 4. Type a name for the printer (if you want to have a unique name), decide if you want this printer to be your default printer, and then click on "Next." Windows NT Users 1. Select the port you added in step 6 in the previous section, and click on "Next." Do not click on "add port." 2. Click on "Next" after clicking on the Manufacturer and Printer Model you are adding in the "Add Printer Wizard" screen. If your printer is not listed, click on "Have Disk" and insert the driver disk that you received from the printer manufacturer. Install the driver, proceeding as instructed until the "Add Printer Wizard" window opens. 3. The "Add Printer Wizard" screen appears. You can name the printer a unique name or keep the default name of the printer as it appears on screen. Click on "Next." 4. The "Add Printer Wizard" screen appears. With this screen, you can choose to either share or not share the print server with other users in the network. If you do want to share the print server, you must click on all of the operating systems that will be sharing the print server, and then click on "Next." Model PS104/PS105/PS110 Print Server Installation Guide
-
 1
1 -
2
-
3
-
4
-
5
-
6
-
 7
7 -
 8
8 -
 9
9 -
 10
10 -
 11
11 -
 12
12 -
 13
13 -
 14
14 -
 15
15 -
 16
16 -
 17
17
 |
 |
