Netgear PS111W PS111W Installation Guide - Page 6
Rear Panel, Normal/Uplink Push Button (Model PS104 and Model PS105 Only) - installation guide
 |
UPC - 606449023459
View all Netgear PS111W manuals
Add to My Manuals
Save this manual to your list of manuals |
Page 6 highlights
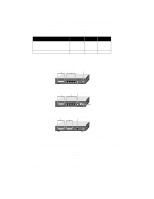
Rear Panel The rear panel of the Model PS104 Print Server and Model PS105 Print Server has one parallel PRINTER port, and the rear panel of the Model PS110 Print Server has two parallel ports for printers (PRINTER 1 and PRINTER 2). These printer ports accept either printers or other parallel devices such as a plotter. Number of Ports 10BASE-T BNC Autosensing 10/100BASE-T Parallel Printer Port PS104 4 n/a n/a 1 PS105 4 1 n/a 1 PS110 n/a n/a 1 2 All models have a power adapter receptacle that accepts a 12 V DC power adapter. PRINTER (parallel) port 4 10BASE-T ports Power adapter receptacle PRINTER NETWORK 4 3 2 1 Normal/Uplink 12VDC 1.2A Normal/Uplink push button Rear Panel of the Model PS104 Print Server PRINTER (parallel) port 4 10BASE-T Normal/Uplink ports push button PRINTER NETWORK 5 4 3 2 1 12VDC 1.2A Normal/Uplink BNC port 10BASE-T connectors Power adapter receptacle Rear Panel of the Model PS105 Print Server PRINTER 2 (parallel) port PRINTER 1 (parallel) port 10/100BASE-T port PRINTER 2 PRINTER 1 NETWORK 12VDC 1.2A Power adapter receptacle Rear Panel of the Model PS110 Print Server 9000FA Normal/Uplink Push Button (Model PS104 and Model PS105 Only) The Normal/Uplink push button on the Model PS104 and Model PS105 print servers allows you to select Normal (MDI-X for connecting to a PC) or Uplink (MDI for connecting to a hub or switch) wiring for the first 10BASE-T port, eliminating the need to use a crossover cable. The other10BASE-T ports on the Model PS104 and Model PS105 print servers are permanently configured for Normal wiring; the one network port on the Model PS110 Print Server is permanently configured for Uplink wiring. Model PS104/PS105/PS110 Print Server Installation Guide
-
 1
1 -
 2
2 -
 3
3 -
 4
4 -
 5
5 -
 6
6 -
 7
7 -
 8
8 -
 9
9 -
 10
10 -
 11
11 -
 12
12 -
13
-
14
-
15
-
16
-
17
 |
 |
