Netgear RN528X00 Hardware Manual - Page 171
Add a 2.5-Inch Disk, To add a 2.5-inch hard disk drive HDD or 2.5-inch solid state drive SSD, Disks
 |
View all Netgear RN528X00 manuals
Add to My Manuals
Save this manual to your list of manuals |
Page 171 highlights
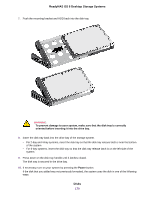
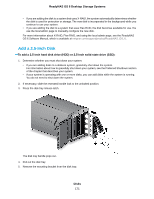
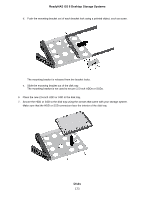
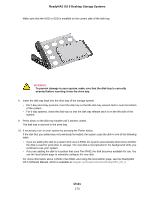
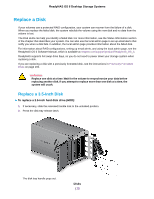
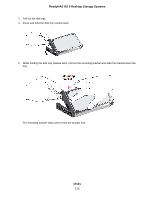
ReadyNAS OS 6 Desktop Storage Systems • If you are adding the disk to a system that uses X-RAID, the system automatically determines whether the disk is used for protection or storage. The new disk is incorporated in the background while you continue to use your system. • If you are adding the disk to a system that uses Flex-RAID, the disk becomes available for use. You use the local admin page to manually configure the new disk. For more information about X-RAID, Flex-RAID, and using the local admin page, see the ReadyNAS OS 6 Software Manual, which is available at netgear.com/support/product/ReadyNAS_OS_6. Add a 2.5-Inch Disk To add a 2.5-inch hard disk drive (HDD) or 2.5-inch solid state drive (SSD): 1. Determine whether you must shut down your system: • If you are adding disks to a diskless system, gracefully shut down the system. For information about how to gracefully shut down your system, see the Preferred Shutdown section of the chapter that describes your system. • If your system is operating with one or more disks, you can add disks while the system is running. You do not need to shut down the system. 2. If necessary, slide the recessed handle lock to the unlocked position. 3. Press the disk tray release latch. The disk tray handle pops out. 4. Pull out the disk tray. 5. Remove the mounting bracket from the disk tray: Disks 171
-
 1
1 -
2
-
3
-
4
-
5
-
6
-
7
-
8
-
9
-
10
-
11
-
12
-
13
-
14
-
15
-
16
-
17
-
18
-
19
-
20
-
21
-
22
-
23
-
24
-
25
-
26
-
27
-
28
-
29
-
30
-
31
-
32
-
33
-
34
-
35
-
36
-
37
-
38
-
39
-
40
-
41
-
42
-
43
-
44
-
45
-
46
-
47
-
48
-
49
-
50
-
51
-
52
-
53
-
54
-
55
-
56
-
57
-
58
-
59
-
60
-
61
-
62
-
63
-
64
-
65
-
66
-
67
-
68
-
69
-
70
-
71
-
72
-
73
-
74
-
75
-
76
-
77
-
78
-
79
-
80
-
81
-
82
-
83
-
84
-
85
-
86
-
87
-
88
-
89
-
90
-
91
-
92
-
93
-
94
-
95
-
96
-
97
-
98
-
99
-
100
-
101
-
102
-
103
-
104
-
105
-
106
-
107
-
108
-
109
-
110
-
111
-
112
-
113
-
114
-
115
-
116
-
117
-
118
-
119
-
120
-
121
-
122
-
123
-
124
-
125
-
126
-
127
-
128
-
129
-
130
-
131
-
132
-
133
-
134
-
135
-
136
-
137
-
138
-
139
-
140
-
141
-
142
-
143
-
144
-
145
-
146
-
147
-
148
-
149
-
150
-
151
-
152
-
153
-
154
-
155
-
156
-
157
-
158
-
159
-
160
-
161
-
162
-
163
-
164
-
165
-
 166
166 -
 167
167 -
 168
168 -
 169
169 -
 170
170 -
 171
171 -
 172
172 -
 173
173 -
 174
174 -
 175
175 -
 176
176 -
177
-
178
-
179
-
180
-
181
-
182
-
183
-
184
-
185
-
186
-
187
-
188
-
189
-
190
-
191
-
192
-
193
-
194
-
195
-
196
-
197
-
198
-
199
-
200
-
201
-
202
-
203
-
204
-
205
-
206
-
207
-
208
-
209
-
210
-
211
-
212
-
213
 |
 |
