Netgear WG602v1 WG602v1 User Manual - Page 4
Installing the WG602, Mbps Wireless, Access Point - router setup
 |
View all Netgear WG602v1 manuals
Add to My Manuals
Save this manual to your list of manuals |
Page 4 highlights
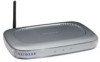
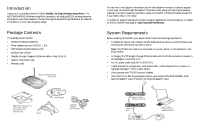
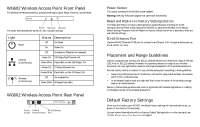
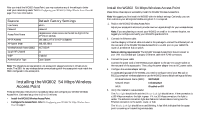
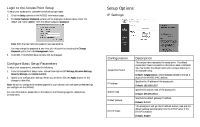
After you install the WG602 Access Point, you may customize any of the settings to better meet your networking needs. Turn to Configuring your WG602 54 Mbps Wireless Access Point on page 7 for more information. Feature User Name Password Access Point Name AP IP Address AP Subnet Mask Wireless Network Name (SSID) 11 g/b RF Channel WEP Authentication Type Default Factory Setttings admin password netgearxxxxxx where xxxxxx are the last six digits of the AP's MAC address 192.168.0.227 of DHCP is disabled 255.255.255.0 NETGEAR 11 Disabled Open System Note: The characters are case sensitive. An access point always functions in infrastructure mode. The SSID for any wireless device communicating with the access point must match the SSID configured in the access point. 1 Installing the WG602 54 Mbps Wireless Access Point These are the basic instructions to successfully setup and configure your WG602 Wireless Access Point. Estimated setup time is 10 to 15 minutes. • Install the WG602 Wireless Access Point. • Configure the Access Point. Refer to Configuring your WG602 54 Mbps Wireless Access Point on page 7. 5 Install the WG602 54 Mbps Wireless Access Point Please follow these steps to successfully install the WG602 Wireless Access Point. Note: We suggest you first install the WG602 with the default settings. Optionally, you can then customize your settings and enable encryption if it is required. 1. Position the WG602 Wireless Access Point. Adjust your access point antenna to provide maximum signal strength for your wireless devices. Note: If you are planning to mount your WG602 on a wall or in a remote location, we suggest you configure and verify your WG602's operations first. 2. Connect the Ethernet cable. Use the category 5 Ethernet cable included in this package to connect the Ethernet port on the rear panel of the WG602 Wireless Access Point to a LAN port on your cable/DSL router or an Ethernet hub or switch. Note on cabling requirements: The WG602 Wireless Access Point should connect to your LAN via a twisted-pair Category 5 Ethernet cable with RJ-45 connectors. 3. Connect the power cable. Connect the power cord of the WG602 power adapter to the 12V DC power socket on the rear panel of the access point. Then, plug the power adapter into an A/C power outlet. 4. Configure the wireless adapter settings. To access settings page of the WG602, you need to configure one of your 802.11b or 802.11g compliant wireless adapters to use the WG602 factory default settings as follows: Wireless Network Name (SSID): NETGEAR Network Mode: Infrastructure WEP: Disabled or Off 5. Verify the installation was successful. The Power light should be lit and the Ethernet Link light should be on. If the connection is a 100 Mbps connection, the light is green. If it is a 10 Mbps connection, the light is amber. The Ethernet connection light also flashes to indicate data is moving over the Ethernet connection to the switch, router, or hub. The Wireless Link light should be on and blinking. A fast blink indicates that the access point is receiving or transmitting wireless data. 6
-
 1
1 -
 2
2 -
 3
3 -
 4
4 -
 5
5 -
 6
6 -
 7
7 -
 8
8 -
 9
9 -
 10
10 -
11
-
12
-
13
-
14
-
15
 |
 |
