Netgear XE104 XE104 User Guide - Page 18
Connect other Ethernet PowerLine Switches, Ethernet activity LED. - password
 |
UPC - 606449041217
View all Netgear XE104 manuals
Add to My Manuals
Save this manual to your list of manuals |
Page 18 highlights
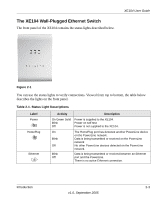
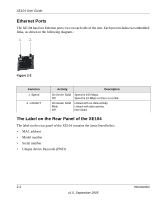
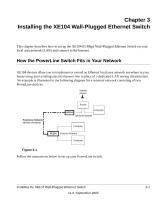
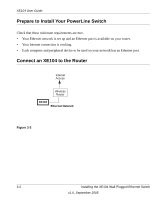
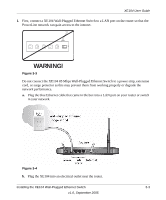
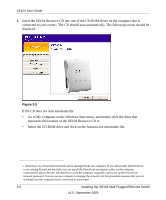
XE104 User Guide c. Plug the other end of blue Ethernet cable that came in the box into the XE104. • Power: The power light should turn solid green. If it does not, see Chapter 4, "Troubleshooting". • HomePlug: The HomePlug port light should blink to indicate that though the device is connected to the power line, no other devices have been detected at this stage. • Ethernet: The Ethernet light should be blinking to indicate activity. If not, make sure the Ethernet cable on the XE104 you connected in the previous step is securely attached to the XE104 and the router, that the router is connected to the modem, and the router and modem are powered on. d. Make sure that the internet port of your router is connected to your modem, and your computer is either connected to a LAN port on the router or a port on the XE104. Connect other Ethernet PowerLine Switches 1. Before plugging in your other XE104 devices, take a note of the device password printed on the label on the back of each device. You will need this password later if you want to change the PowerLine network password. If you are adding more than one other XE104 device, also note the MAC address given on the label, so that you can associate the device with its corresponding password. 2. Plug your other XE104 devices into power outlets in your home near to the other computers and peripherals to be included in your PowerLine local area network. 3. Use an Ethernet cable to connect from an Ethernet port on each of the computers/peripherals to the nearest XE104 device. 4. Check that when a second XE104 is plugged into a power outlet, the blue HomePlug LEDs turn to almost solid on with a brief off period synchronized to the blink-on pulse of the Ethernet activity LED. This completes the PowerLine installation. 3-4 Installing the XE104 Wall-Plugged Ethernet Switch v1.0, September 2005
-
 1
1 -
2
-
3
-
4
-
5
-
6
-
7
-
8
-
9
-
10
-
11
-
12
-
 13
13 -
 14
14 -
 15
15 -
 16
16 -
 17
17 -
 18
18 -
 19
19 -
 20
20 -
 21
21 -
 22
22 -
 23
23 -
24
-
25
-
26
-
27
-
28
 |
 |