Nikon 4804 Instruction Manual - Page 31
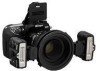
Attaching the SB-R200 to the front of the lens.
 |
UPC - 018208048045
View all Nikon 4804 manuals
Add to My Manuals
Save this manual to your list of manuals |
Page 31 highlights
Flash operation using the R1C1 4 Attaching the SB-R200 to the front of the lens. 1 Attach one of the Adapter Rings to the front of the lens. Five types of Adapter Rings with different diameters (ø52mm, ø62mm, ø67mm, ø72mm, and ø77mm) are provided. • Turn the Adapter Ring securely until it stops. • These rings cannot be used together with other lens filters. • AF Micro-Nikkor 105mm f/2.8D is shown in the illustration. 2 Press the Attachment Ring SX-1's Mounting Buttons on both sides to attach it to the Adapter Ring, then release. • Make sure that the Nikon logo (p. 24) on the SX-1 is on the under side facing down. • Use fingers of both hands to press the two Mounting Buttons on both sides to attach the SX-1 securely. • Make sure that the SX-1 is not attached at an angle. If it is, remove and reattach. 3 Slide the SB-R200's Mounting Foot into the SX-1's Mounting Groove, then slide the lock switch. The Mounting Foot cannot be inserted in reverse. • Slide the lock switch until it stops and make sure that the red part can no longer be seen. 4 Move the SB-R200 slowly by holding down the Release Button on the SB-R200's Mounting Foot. Remove your fingers at the desired position to secure it. There are click stops every 15° on the Attachment Ring. 31 LOCK LOCK
-
 1
1 -
2
-
3
-
4
-
5
-
6
-
7
-
8
-
9
-
10
-
11
-
12
-
13
-
14
-
15
-
16
-
17
-
18
-
19
-
20
-
21
-
22
-
23
-
24
-
25
-
 26
26 -
 27
27 -
 28
28 -
 29
29 -
 30
30 -
 31
31 -
 32
32 -
 33
33 -
 34
34 -
 35
35 -
 36
36 -
37
-
38
-
39
-
40
-
41
-
42
-
43
-
44
-
45
-
46
-
47
-
48
-
49
-
50
-
51
-
52
-
53
-
54
-
55
-
56
-
57
-
58
-
59
-
60
-
61
-
62
-
63
-
64
-
65
-
66
-
67
-
68
-
69
-
70
-
71
-
72
-
73
-
74
-
75
-
76
-
77
-
78
-
79
-
80
-
81
-
82
-
83
-
84
-
85
-
86
-
87
-
88
-
89
-
90
-
91
-
92
-
93
-
94
-
95
-
96
-
97
-
98
-
99
-
100
-
101
-
102
-
103
-
104
-
105
-
106
-
107
-
108
-
109
-
110
-
111
-
112
-
113
-
114
-
115
-
116
-
117
-
118
-
119
-
120
-
121
-
122
-
123
-
124
-
125
-
126
-
127
-
128
-
129
-
130
-
131
-
132
-
133
-
134
 |
 |
