Nikon COOLPIX S3100 User Manual - Page 23
Switching Between Tabs in the Menu Screen, The Shutter-release Button, Attaching the Camera Strap
 |
View all Nikon COOLPIX S3100 manuals
Add to My Manuals
Save this manual to your list of manuals |
Page 23 highlights
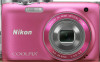
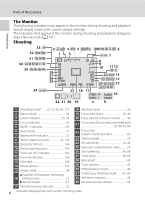
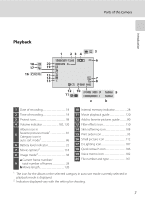
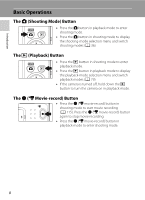
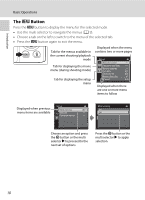
Introduction Basic Operations Switching Between Tabs in the Menu Screen In the menu screen that is displayed when the d button is pressed (A 10), select the left end tab to switch to the menu of the selected tab. Shooting menu Image mode White balance Continuous ISO sensitivity Color options AF area mode Autofocus mode Shooting menu Image mode White balance Continuous ISO sensitivity Color options AF area mode Autofocus mode Set up Welcome screen Time zone and date Monitor settings Print date Electronic VR Motion detection AF assist Press the multi selector J to highlight the tab Press the multi selector H or I to select a tab, and press either the k button or K The selected menu is displayed The Shutter-release Button The camera features a two-stage shutter-release button. To set focus and exposure, press the shutter-release button halfway, stopping when you feel resistance. When the shutter-release button is pressed halfway, focus and exposure (shutter speed and aperture value) are set. Focus and exposure remain locked while the shutter-release button is pressed halfway. While the shutter-release button is held in this position, release the shutter and take a picture by pressing the shutter-release button the rest of the way down. Do not use force when pressing the shutter-release button, as this may result in camera shake and blurred images. Press the shutter-release button halfway to set focus and exposure Attaching the Camera Strap Press the shutter-release button the rest of the way down to take a picture 11
-
 1
1 -
2
-
3
-
4
-
5
-
6
-
7
-
8
-
9
-
10
-
11
-
12
-
13
-
14
-
15
-
16
-
17
-
 18
18 -
 19
19 -
 20
20 -
 21
21 -
 22
22 -
 23
23 -
 24
24 -
 25
25 -
 26
26 -
 27
27 -
 28
28 -
29
-
30
-
31
-
32
-
33
-
34
-
35
-
36
-
37
-
38
-
39
-
40
-
41
-
42
-
43
-
44
-
45
-
46
-
47
-
48
-
49
-
50
-
51
-
52
-
53
-
54
-
55
-
56
-
57
-
58
-
59
-
60
-
61
-
62
-
63
-
64
-
65
-
66
-
67
-
68
-
69
-
70
-
71
-
72
-
73
-
74
-
75
-
76
-
77
-
78
-
79
-
80
-
81
-
82
-
83
-
84
-
85
-
86
-
87
-
88
-
89
-
90
-
91
-
92
-
93
-
94
-
95
-
96
-
97
-
98
-
99
-
100
-
101
-
102
-
103
-
104
-
105
-
106
-
107
-
108
-
109
-
110
-
111
-
112
-
113
-
114
-
115
-
116
-
117
-
118
-
119
-
120
-
121
-
122
-
123
-
124
-
125
-
126
-
127
-
128
-
129
-
130
-
131
-
132
-
133
-
134
-
135
-
136
-
137
-
138
-
139
-
140
-
141
-
142
-
143
-
144
-
145
-
146
-
147
-
148
-
149
-
150
-
151
-
152
-
153
-
154
-
155
-
156
-
157
-
158
-
159
-
160
-
161
-
162
-
163
-
164
-
165
-
166
-
167
-
168
-
169
-
170
-
171
-
172
-
173
-
174
-
175
-
176
-
177
-
178
-
179
-
180
-
181
-
182
-
183
-
184
-
185
-
186
-
187
-
188
-
189
-
190
-
191
-
192
-
193
-
194
-
195
-
196
 |
 |