Nikon COOLPIX S8100 S8100 User's Manual - Page 39
Note on Saving Images, Autofocus, Note on Face Detection, When the Subject Is Close to the Camera - camera case
 |
View all Nikon COOLPIX S8100 manuals
Add to My Manuals
Save this manual to your list of manuals |
Page 39 highlights
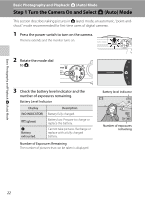
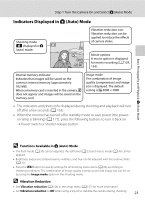
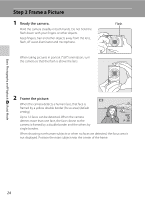
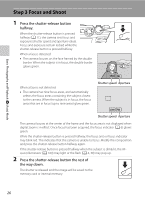
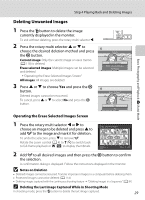
Basic Photography and Playback: A (Auto) Mode Step 3 Focus and Shoot B Note on Saving Images While images are being saved, the number of exposures remaining will blink. Do not open the battery-chamber/memory card slot cover while images are being saved. Cutting power or removing the memory card in these circumstances could result in loss of data or in damage to the camera or card. B Autofocus Autofocus may not perform as expected in the following situations. In some rare cases, the subject may not be in focus despite the fact that the focus area or the focus indicator glows green: • Subject is very dark • Objects of sharply differing brightness are included in the scene (e.g. the sun is behind the subject and the subject is in deep shadow) • No contrast between the subject and surroundings (e.g. when the subject is wearing a white shirt and is standing in front of a white wall) • Subject contains objects of varying distances from the camera (such as a cage with an animal inside) • Subjects with repeating patterns (window blinds, buildings with multiple rows of similarly shaped windows, etc.) • Subject is moving rapidly In the situations noted above, try pressing the shutter-release button halfway to refocus several times, or focus on another subject positioned at the same distance from the camera as the actual desired subject, and use focus lock (A 51). B Note on Face Detection See "AF Area Mode" (A 50) or "Face Detection" (A 52) for more information. B When the Subject Is Close to the Camera If the camera cannot focus, try shooting with macro mode (A 36) or the Close-up scene mode (A 64). C Flash • When the flash mode (A 30) is set to U (auto) (default setting) and the subject is dimly lit, the flash pops up automatically when the shutter-release button is pressed halfway, and the flash fires when the shutter-release button is pressed the rest of the way. • If the flash mode is set to W (off) (A 30), the camera can shoot pictures with the flash lowered. • Lower the flash by gently pushing it down. When not taking pictures, lower the flash. 27
-
 1
1 -
2
-
3
-
4
-
5
-
6
-
7
-
8
-
9
-
10
-
11
-
12
-
13
-
14
-
15
-
16
-
17
-
18
-
19
-
20
-
21
-
22
-
23
-
24
-
25
-
26
-
27
-
28
-
29
-
30
-
31
-
32
-
33
-
 34
34 -
 35
35 -
 36
36 -
 37
37 -
 38
38 -
 39
39 -
 40
40 -
 41
41 -
 42
42 -
 43
43 -
 44
44 -
45
-
46
-
47
-
48
-
49
-
50
-
51
-
52
-
53
-
54
-
55
-
56
-
57
-
58
-
59
-
60
-
61
-
62
-
63
-
64
-
65
-
66
-
67
-
68
-
69
-
70
-
71
-
72
-
73
-
74
-
75
-
76
-
77
-
78
-
79
-
80
-
81
-
82
-
83
-
84
-
85
-
86
-
87
-
88
-
89
-
90
-
91
-
92
-
93
-
94
-
95
-
96
-
97
-
98
-
99
-
100
-
101
-
102
-
103
-
104
-
105
-
106
-
107
-
108
-
109
-
110
-
111
-
112
-
113
-
114
-
115
-
116
-
117
-
118
-
119
-
120
-
121
-
122
-
123
-
124
-
125
-
126
-
127
-
128
-
129
-
130
-
131
-
132
-
133
-
134
-
135
-
136
-
137
-
138
-
139
-
140
-
141
-
142
-
143
-
144
-
145
-
146
-
147
-
148
-
149
-
150
-
151
-
152
-
153
-
154
-
155
-
156
-
157
-
158
-
159
-
160
-
161
-
162
-
163
-
164
-
165
-
166
-
167
-
168
-
169
-
170
-
171
-
172
-
173
-
174
-
175
-
176
-
177
-
178
-
179
-
180
-
181
-
182
-
183
-
184
-
185
-
186
-
187
-
188
-
189
-
190
-
191
-
192
-
193
-
194
-
195
-
196
-
197
-
198
-
199
-
200
-
201
-
202
-
203
-
204
-
205
-
206
-
207
-
208
-
209
-
210
-
211
-
212
-
213
-
214
-
215
-
216
-
217
-
218
-
219
-
220
 |
 |