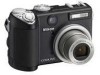
Nikon Coolpix P5000 P5000 User's Manual - Page 101
Interface, FUNC Button, Reset All, Firmware Version, Option, Description, Video mode, Auto transfer
 |
UPC - 018208255658
View all Nikon Coolpix P5000 manuals
Add to My Manuals
Save this manual to your list of manuals |
Page 101 highlights
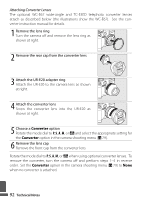
m Interface Adjust settings for connection to a computer or video device. Option Description USB Select USB option for connection to computer (B 56) or printer (B 61). Video mode Choose from NTSC and PAL (B 55). Auto transfer Choose On to mark all new pictures for transfer to computer (B 56). N FUNC Button Choose the function performed by the A button in P, S, A, and M modes. Option Description ISO sensitivity Pressing A button displays ISO sensitivity options (B 71). Rotate command (default) dial to highlight desired option and release A button. Image quality Pressing A button displays image quality options (B 66). dial to highlight desired option and release A button. Rotate command Image size Pressing A button displays image size options (B 66). Rotate command dial to highlight desired option and release A button. White balance Pressing A button displays white balance options (B 70). Rotate command dial to highlight desired option and release A button. If White bal. preset is selected, dialog shown in Step 3 on page 70 will be displayed. Vibration Pressing A button displays vibration reduction options (B 87). Rotate com- reduction mand dial to highlight desired option and release A button. V Reset All Select Reset to restore camera settings to default values (B 104). f Firmware Version View the current camera firmware version. Menu Guide 89
-
 1
1 -
2
-
3
-
4
-
5
-
6
-
7
-
8
-
9
-
10
-
11
-
12
-
13
-
14
-
15
-
16
-
17
-
18
-
19
-
20
-
21
-
22
-
23
-
24
-
25
-
26
-
27
-
28
-
29
-
30
-
31
-
32
-
33
-
34
-
35
-
36
-
37
-
38
-
39
-
40
-
41
-
42
-
43
-
44
-
45
-
46
-
47
-
48
-
49
-
50
-
51
-
52
-
53
-
54
-
55
-
56
-
57
-
58
-
59
-
60
-
61
-
62
-
63
-
64
-
65
-
66
-
67
-
68
-
69
-
70
-
71
-
72
-
73
-
74
-
75
-
76
-
77
-
78
-
79
-
80
-
81
-
82
-
83
-
84
-
85
-
86
-
87
-
88
-
89
-
90
-
91
-
92
-
93
-
94
-
95
-
 96
96 -
 97
97 -
 98
98 -
 99
99 -
 100
100 -
 101
101 -
 102
102 -
 103
103 -
 104
104 -
 105
105 -
 106
106 -
107
-
108
-
109
-
110
-
111
-
112
-
113
-
114
-
115
-
116
-
117
-
118
-
119
-
120
-
121
-
122
-
123
-
124
-
125
-
126
-
127
 |
 |
