Nikon R1C1 Wireless Close-Up Speedlight System Users Manual - English - Page 107
Flash shooting with Speedlight Stand AS-20
 |
View all Nikon R1C1 Wireless Close-Up Speedlight System manuals
Add to My Manuals
Save this manual to your list of manuals |
Page 107 highlights
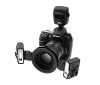
z Flash operation using various accessories AS-20 4 Flash shooting with Speedlight Stand AS-20 Use the provided Speedlight Stand AS-20 to freely position the SB-R200. The Attachment Ring SX-1 can be attached to a tripod. Example H H-1 Flash setup SU-800 Group A SB-R200 Dual-light flash operation When shooting clear glasses (H-4) with a single built-in flash unit, distinct shadows appear behind the subject, meaning the texture of the glass cannot be reproduced successfully. In this setup (H-1), the SB-R200 is placed on the right behind the subject using the AS-20 to bounce light off the rear wall. In addition, another SB-R200 is used from the top. The result is a successful rendering of the textures and contours of the glasses. Group B SB-R200 AS-20 • Camera: D70 • Lens: AF-S DX Zoom-Nikkor 18-70mm f/3.5-4.5G IF-ED • Group A: SB-R200 (TTL) • Group B: SB-R200 (TTL) H-4 example in "Close-up Speedlight Photography Examples" was taken using a single built-in flash. Attachment of the SB-R200 to the AS-20 1 Slide the SB-R200's mounting foot into the AS-20's Speedlight mounting shoe and slide the Lock switch. • Slide the Lock switch until it stops and make sure the red part can no longer be seen. • To remove, slide the Lock switch and remove. LOCK 2 Adjust the SB-R200's flash head. • The flash head of the SB-R200 tilts down to 60° and up to 45°. The flash head can be set at click stops every 15°. 107
-
 1
1 -
2
-
3
-
4
-
5
-
6
-
7
-
8
-
9
-
10
-
11
-
12
-
13
-
14
-
15
-
16
-
17
-
18
-
19
-
20
-
21
-
22
-
23
-
24
-
25
-
26
-
27
-
28
-
29
-
30
-
31
-
32
-
33
-
34
-
35
-
36
-
37
-
38
-
39
-
40
-
41
-
42
-
43
-
44
-
45
-
46
-
47
-
48
-
49
-
50
-
51
-
52
-
53
-
54
-
55
-
56
-
57
-
58
-
59
-
60
-
61
-
62
-
63
-
64
-
65
-
66
-
67
-
68
-
69
-
70
-
71
-
72
-
73
-
74
-
75
-
76
-
77
-
78
-
79
-
80
-
81
-
82
-
83
-
84
-
85
-
86
-
87
-
88
-
89
-
90
-
91
-
92
-
93
-
94
-
95
-
96
-
97
-
98
-
99
-
100
-
101
-
 102
102 -
 103
103 -
 104
104 -
 105
105 -
 106
106 -
 107
107 -
 108
108 -
 109
109 -
 110
110 -
 111
111 -
 112
112 -
113
-
114
-
115
-
116
-
117
-
118
-
119
-
120
-
121
-
122
-
123
-
124
-
125
-
126
-
127
-
128
-
129
-
130
-
131
-
132
-
133
-
134
 |
 |
