Nikon R1C1 Wireless Close-Up Speedlight System Users Manual - English - Page 113
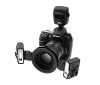
Flash shooting using SLR cameras not compatible with CLS, Press the [Test] button to test fire
 |
View all Nikon R1C1 Wireless Close-Up Speedlight System manuals
Add to My Manuals
Save this manual to your list of manuals |
Page 113 highlights
MODE NO AF-ILL AB SEL READY ON/OFF LOCK 5 Press the [Test] button to test fire the flash units. Press the [Test] button on the SU-800 to test fire the SB-R200. • Flash units fire at an M1/64 flash output in the TTL and at a specified output in the M (manual) mode. E AB L SEL READY LOC 6 Compose a picture and shoot with flash. Confirm that the red ready-lights on the SU-800 and SB-R200 are on, then release the shutter. z Flash shooting using SLR cameras not compatible with CLS v If the red ready-light blinks immediately after shooting E AB SEL READY LOCK In TTL BL or TTL mode, when the SB-R200 flash has fired at its maximum output and underexposure may have occurred, the red ready-lights on the SU-800, SB-R200 and in the camera's viewfinder will blink for approx. 3 sec. (Depending on the camera in use, the ready-lights on the SU-800 and SB-R200 may blink, or only the ready-light in the camera's viewfinder.) To compensate, set a higher ISO sensitivity or use a wider aperture and reshoot. t In the M (manual) mode, set manual flash output level. Press the [SEL](FUNC.) button to display the manual flash output level value (blinking). Press the [W] or [X] button to increase or decrease the value. Press the [SEL](FUNC.) button once again and the value will stop blinking. The last value to blink is the one that has been set automatically. • Manual flash output level can be set separately for Group A and Group B. • Manual flash output level can be set in 1 step increment or decrement from M1/1 to M1/64 output (M1/8 is preset when shipped from the factory.) • Pressing the [W] or [X] button continuously increases or decreases the value quickly. • Manual flash output level blinks during adjustment and stops after blinking six times unless an adjustment is made. The last value to blink is the one that has been set automatically. 113
-
 1
1 -
2
-
3
-
4
-
5
-
6
-
7
-
8
-
9
-
10
-
11
-
12
-
13
-
14
-
15
-
16
-
17
-
18
-
19
-
20
-
21
-
22
-
23
-
24
-
25
-
26
-
27
-
28
-
29
-
30
-
31
-
32
-
33
-
34
-
35
-
36
-
37
-
38
-
39
-
40
-
41
-
42
-
43
-
44
-
45
-
46
-
47
-
48
-
49
-
50
-
51
-
52
-
53
-
54
-
55
-
56
-
57
-
58
-
59
-
60
-
61
-
62
-
63
-
64
-
65
-
66
-
67
-
68
-
69
-
70
-
71
-
72
-
73
-
74
-
75
-
76
-
77
-
78
-
79
-
80
-
81
-
82
-
83
-
84
-
85
-
86
-
87
-
88
-
89
-
90
-
91
-
92
-
93
-
94
-
95
-
96
-
97
-
98
-
99
-
100
-
101
-
102
-
103
-
104
-
105
-
106
-
107
-
 108
108 -
 109
109 -
 110
110 -
 111
111 -
 112
112 -
 113
113 -
 114
114 -
 115
115 -
 116
116 -
 117
117 -
 118
118 -
119
-
120
-
121
-
122
-
123
-
124
-
125
-
126
-
127
-
128
-
129
-
130
-
131
-
132
-
133
-
134
 |
 |
