Nikon S51c S51c Public Wireless LAN Connection Guide - Page 11
Create a Recipient Group, ter-release button. - specifications
 |
UPC - 018208255757
View all Nikon S51c manuals
Add to My Manuals
Save this manual to your list of manuals |
Page 11 highlights
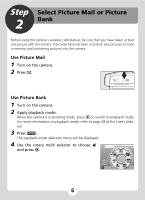
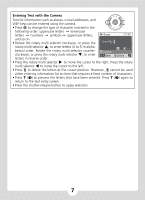
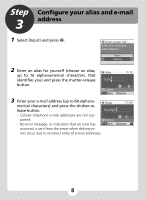
Create a Recipient Group Recipients can be grouped for specification of multiple recipients as a single Picture Mail recipient. This is useful when sending multiple Picture Mails to the same re- cipients. 1 Follow the procedure described in Step 5-1. 2 Select [Group] and press d. Up to 5 groups can be created. n New Address Group 3 Specify the group's name (up to 16 alpha- n Group 5 16 numerical characters) and press the shut- ter-release button. Ni kon 4 Select recipients for the group. - Use the rotary multi selector to highlight recipients and press d to select the recipients (y). Press d again to cancel the selection. - Up to 30 recipients can be added to each group. - Press the shutter-release button to finalize re- cipient selection. Confirm Back Delete n Choose address [email protected] [email protected] [email protected] [email protected] [email protected] Back ON/OFF Confirm 11
-
 1
1 -
2
-
3
-
4
-
5
-
 6
6 -
 7
7 -
 8
8 -
 9
9 -
 10
10 -
 11
11 -
 12
12 -
 13
13 -
 14
14 -
 15
15 -
 16
16 -
17
-
18
-
19
-
20
-
21
-
22
-
23
-
24
 |
 |
