Nikon S51c S51c Public Wireless LAN Connection Guide - Page 12
Step 6 Specify recipients for selected pictures
 |
UPC - 018208255757
View all Nikon S51c manuals
Add to My Manuals
Save this manual to your list of manuals |
Page 12 highlights
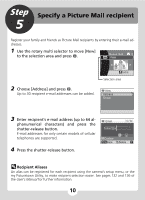
Step 6 Specify recipients for selected pictures 1 Choose recipients. - Rotate the rotary multi selector to move b (recipients) to the selection area, and press d to select the recipient (a). Press d again to cancel the selection. - The number displayed at the top right of the Queue mail a 4 ab [email protected] ab ab b g h b ab ON/OFF Confirm monitor indicates the number of recipients specified for a displayed picture. Selection area 2 Press the shutter-release button to add the Picture Mail to the queue. - To specify recipients for different pictures, repeat Steps 4 and 6-1 before applying the setting. Up to 30 pictures can be selected. - Press t (j) to switch to thumbnail display to preview the pictures select- ed in the queue mail screen. Press v (k) to return to the queue mail screen. 3 Choose [Yes] and press d. - The camera will search for available SSIDs. Send pictures Your Picture Mail has - When connection is established, all the pictures in the queue will be uploaded. Proceed to Step 7. - To upload pictures later, choose [No]. been added to the queue. Send now? No Yes 12
-
 1
1 -
2
-
3
-
4
-
5
-
6
-
 7
7 -
 8
8 -
 9
9 -
 10
10 -
 11
11 -
 12
12 -
 13
13 -
 14
14 -
 15
15 -
 16
16 -
 17
17 -
18
-
19
-
20
-
21
-
22
-
23
-
24
 |
 |
