Nikon S51c S51c Public Wireless LAN Connection Guide - Page 8
Step 3 Con your alias and e-mail address
 |
UPC - 018208255757
View all Nikon S51c manuals
Add to My Manuals
Save this manual to your list of manuals |
Page 8 highlights
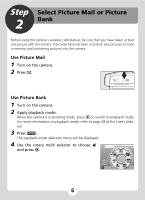
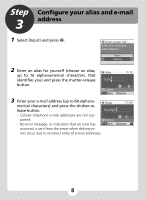
Step 3 Configure your alias and e-mail address 1 Select [Input] and press d. n Enter sender info Enter your alias and email address Input Cancel 2 Enter an alias for yourself (choose an alias, n Alias 6 16 up to 16 alphanumerical characters, that identifies you) and press the shutter-release N i kon4 button. Confirm Back Delete 3 Enter your e-mail address (up to 64 alphanu- n Email 10 64 merical characters) and press the shutter-re- lease button. Ni kon4@xxx - Cellular telephone e-mail addresses are not sup- ported. Confirm - No error message, or indication that an error has Back Delete occurred, is sent from the server when delivery er- rors occur due to incorrect entry of e-mail addresses. 8
-
 1
1 -
2
-
 3
3 -
 4
4 -
 5
5 -
 6
6 -
 7
7 -
 8
8 -
 9
9 -
 10
10 -
 11
11 -
 12
12 -
 13
13 -
14
-
15
-
16
-
17
-
18
-
19
-
20
-
21
-
22
-
23
-
24
 |
 |

8
Step
3
Configure your alias and e-mail
address
1
Select [Input] and press
d
.
2
Enter an alias for yourself (choose an alias,
up to 16 alphanumerical characters, that
identifies you) and press the shutter-release
button.
3
Enter your e-mail address (up to 64 alphanu-
merical characters) and press the shutter-re-
lease button.
-
Cellular telephone e-mail addresses are not sup-
ported.
-
No error message, or indication that an error has
occurred, is sent from the server when delivery er-
rors occur due to incorrect entry of e-mail addresses.
n
Enter your alias and
email address
Cancel
Input
Enter sender info
n
16
6
Nik
n
o
4
Confirm
Alias
Back
Delete
n
Email
Confirm
Back
Delete
64
10
Nik
n4
o
x
x
x
@