NordicTrack Cx 1055 Elliptical Exerciser English Manual - Page 5
Assembly
 |
View all NordicTrack Cx 1055 Elliptical Exerciser manuals
Add to My Manuals
Save this manual to your list of manuals |
Page 5 highlights
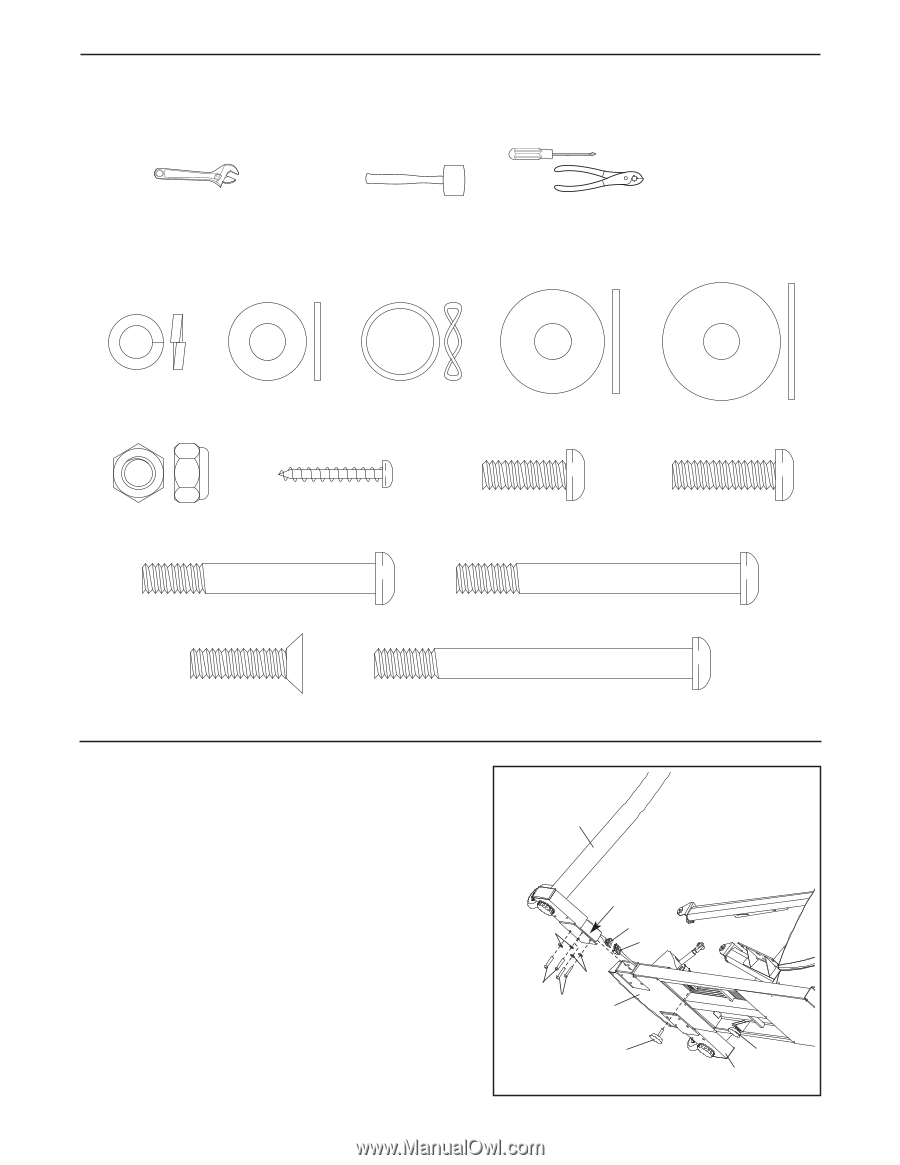
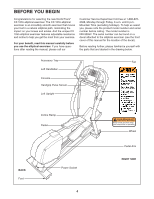
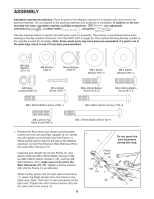
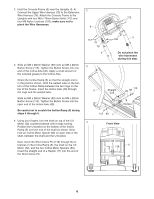
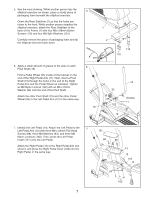
ASSEMBLY Assembly requires two persons. Place all parts of the elliptical exerciser in a cleared area and remove the packing materials. Do not dispose of the packing materials until assembly is completed. In addition to the two included hex keys, assembly requires a phillips screwdriver , two adjustable wrenches , a rubber mallet , and pliers . Use the drawings below to identify the small parts used for assembly. The number in parenthesis below each drawing is the key number of the part, from the PART LIST on page 25. The number following the key number is the quantity needed for assembly. Note: Some small parts may have been pre-assembled. If a part is not in the parts bag, check to see if it has been pre-assembled. M8 Split Washer (101)-12 M8 Washer (94)-6 Wave Washer (100)-2 M8 x 25mm Washer (95)-2 M8 x 28mm Washer (99)-4 M8 Nylon Locknut (102)-12 M4 x 25mm Screw (105)-4 M8 x 20mm Button Screw (113)-2 M8 x 25mm Button Screw (81)-2 M8 x 56mm Button Screw (108)-4 M8 x 68mm Button Screw (110)-8 M8 x 23mm Flat Head Screw (88)-6 M8 x 76mm Button Bolt (112)-4 1. Remove the Pivot Arms (not shown) and the plastic inserts from the Left and Right Uprights (4, 3). Identify the Left Upright (4) and hold it near the Frame (1). While another person lifts the left side of the elliptical exerciser, connect the Extension Wire Harness (76) to the Lower Wire Harness (77). Insert the Left Upright (4) into the Frame (1), and attach it with two M8 x 56mm Button Screws (108), two M8 x 68mm Button Screws (110), and four M8 Split Washers (101); make sure not to pinch the Wire Harnesses (76, 77). Tighten a Frame Cushion (32) into the Frame (1) as indicated. While another person lifts the right side of the Frame (1), attach the Right Upright (3) to the Frame in the same way. (Note: There are no wire harnesses on the right side.) Tighten the other Frame Cushion (32) into the other side of the Frame (1). 5 1 4 Do not pinch the wire harnesses during this step. Plastic Insert 101 76 77 101 108 110 1 32 32 3
-
 1
1 -
 2
2 -
 3
3 -
 4
4 -
 5
5 -
 6
6 -
 7
7 -
 8
8 -
 9
9 -
 10
10 -
 11
11 -
12
-
13
-
14
-
15
-
16
-
17
-
18
-
19
-
20
-
21
-
22
-
23
-
24
-
25
-
26
-
27
-
28
 |
 |