NordicTrack Exp2000 Treadmill English Manual - Page 11
How To Use The Manual Mode
 |
View all NordicTrack Exp2000 Treadmill manuals
Add to My Manuals
Save this manual to your list of manuals |
Page 11 highlights
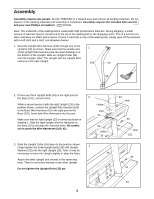
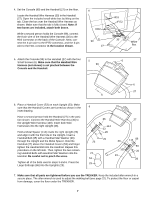
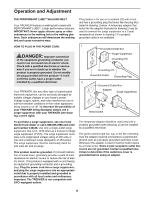
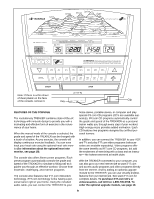
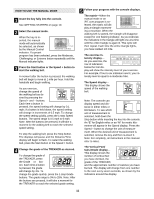
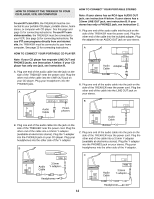
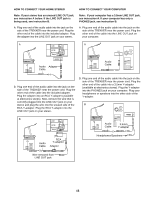
HOW TO USE THE MANUAL MODE 1 Insert the key fully into the console. See GETTING STARTED on page 10. 2 Select the manual mode. When the key is inserted, the manual mode will automatically be selected, as shown by the Manual Control indicator. If a preset program has been selected, press the Moderate, Challenging, or Extreme button repeatedly until the Manual indicator lights. 3 Press the Start button or the Speed + button to start the walking belt. A moment after the button is pressed, the walking belt will begin to move at 1 mile per hour. Hold the handrails and begin walking. As you exercise, change the speed of the walking belt as desired by pressing the Speed + and - buttons. Each time a button is pressed, the speed setting will change by 0.1 mph; if a button is held down, the speed setting will change in increments of 0.5 mph. To change the speed setting quickly, press the 1-step Speed buttons. The speed range is 0.5 mph to 6 mph. Note: After the buttons are pressed, it will take a moment for the walking belt to reach the selected speed setting. To stop the walking belt, press the Stop button. The displays will pause and the Distance/Time display will begin to flash. To restart the walking belt, press the Start button or the Speed + button. 4 Change the grade of the TREKKER as desired. To change the grade of the TREKKER, press the Grade v or w button. Each time a button is pressed, the grade will change by 1%. To change the grade quickly, press the 1-step Grade buttons. The grade range is 0% to 25%. Note: After the buttons are pressed, it will take a moment for the TREKKER to reach the selected grade setting. 5 Follow your progress with the console displays. The matrix-When the manual mode or an iFIT.com program is selected, the matrix will display a triangle representing a mountain. When the walking belt is started, the triangle will disappear except for one flashing indicator. As you exercise, the indicators in the triangle will light one at a time until the entire triangle is again lit. This cycle will then repeat. Each time the entire triangle lights, you have walked 1/4 mile. The exercise intensity display- As you exercise, the row of indicators below the trail display will show the intensity level of your exercise. For example, if four to six indicators are lit, your intensity level is equal to a moderate hike. The Speed display- This display shows the speed of the walking belt. Note: The console can display speed and distance in either miles or kilometers. To see which unit of measurement is selected, hold down the Stop button while inserting the key into the console. An "E" for English miles or an "M" for metric kilometers will appear in the Speed display. Press the Speed + button to change the unit of measurement. When the desired unit of measurement is selected, remove the key and then re-insert it. Note: For simplicity, all instructions in this manual refer to miles. The Vertical Feet/ Cals./Grade display- This display shows the number of vertical feet you have climbed, the grade of the TREKKER, and the approximate number of calories you have burned. The display will change from one number to the next every seven seconds, as shown by the indicators around the display. 11
-
 1
1 -
2
-
3
-
4
-
5
-
 6
6 -
 7
7 -
 8
8 -
 9
9 -
 10
10 -
 11
11 -
 12
12 -
 13
13 -
 14
14 -
 15
15 -
 16
16 -
17
-
18
-
19
-
20
-
21
-
22
-
23
-
24
-
25
-
26
-
27
 |
 |
